



The remote is in your hand, its light comes on, and the electric bed stays completely still. You change the batteries, press the pairing button, and try again. Nothing happens. Before you order a replacement, remember that the remote is only one part of the system. The control box, power supply, receiver, cables, and motors can all create the same bedside symptom.
This guide follows that system from the handset outward. You'll learn how to pair an electric bed remote, identify the difference between a weak battery and a failed motor channel, choose a compatible replacement, and protect the user and equipment during everyday operation.
What an Electric Bed Remote Actually Does
When an electric bed remote suddenly stops responding, it's tempting to treat it like a television clicker. That approach can waste time. A modern handset sends commands to a control box, and the control box distributes power and instructions to the bed's head motor, foot motor, optional massage module, and other connected functions.
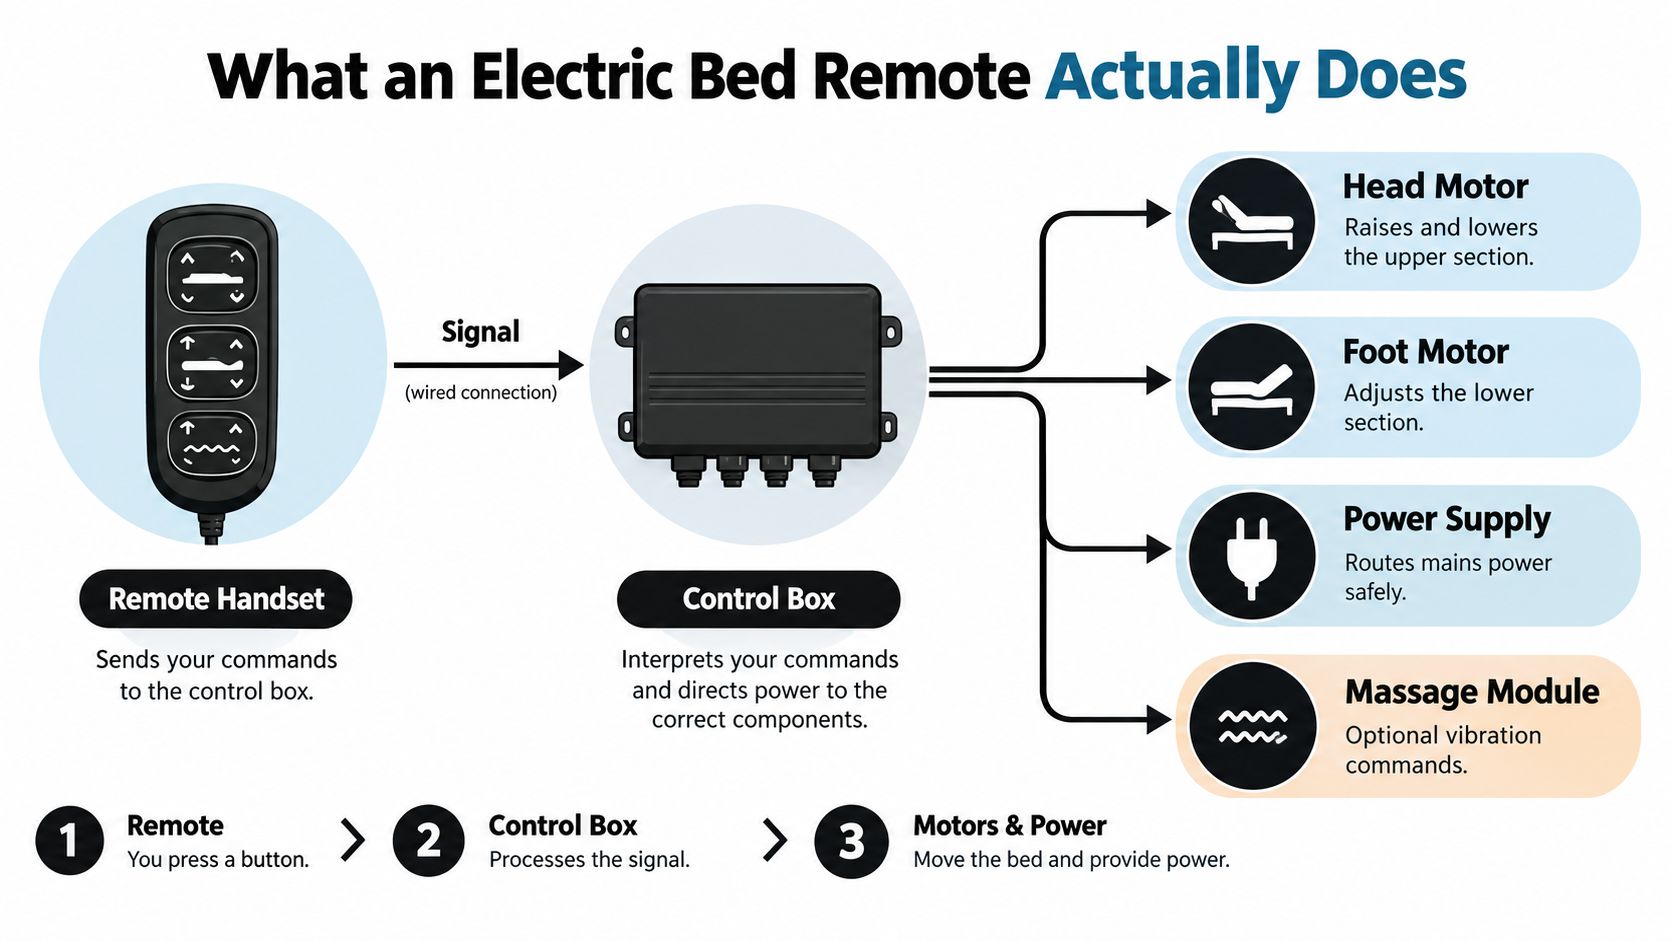
Map the buttons to the hardware
Start by identifying what each button controls.
- Head buttons raise or lower the upper section through the head actuator.
- Foot buttons move the lower section through a separate actuator.
- Flat or memory buttons can command several motors at once.
- Massage controls communicate with an optional massage module.
- Light or accessory buttons may operate a separate feature rather than bed articulation.
That map gives you a useful diagnostic shortcut. If the head rises and lowers but the foot section does nothing, the handset probably isn't the main problem. A foot actuator, motor lead, control-box channel, or connector may have failed while the rest of the system remains functional.
A remote may use RF or IR signals, and many wireless designs operate at 433 MHz or 315 MHz. RF models generally work through bedding and from different angles, while IR models need a clearer path between the handset and receiver. Compatibility depends on the exact bed model and control-box generation, not merely the name printed on the mattress or frame.
Practical rule: Treat every button as a test command. A selective failure tells you more than a handset that appears completely dead.
The remote remains important because it's the main interface for head, foot, and full-frame adjustment. Those adjustments can affect comfort and positioning, which is why caregivers may also benefit from this overview of how adjustable beds improve sleep. For equipment-specific information, keep the manufacturer's manual available, and consult the medical adjustable beds guide when you're comparing home-care bed functions.
Pairing and Syncing Your Remote the First Time
Pairing works best as one continuous process. First, locate the control box under or behind the bed, then look for a small learn, sync, or pairing button. Some boxes place the button beside an LED, while others hide it near the cable sockets.
Make sure the bed has power before entering pairing mode. Press or hold the control-box button according to the bed's instructions until the indicator begins flashing, then activate the matching command on the handset. A successful wireless pairing commonly takes about 5 to 10 seconds, and the LED often stops flashing when the receiver accepts the remote. This practical buyer's guide to adjustable bed remotes explains why pairing matters when a wireless handset is replaced.
Follow the path that matches your remote
RF remotes usually need the control box placed in learn mode, followed by a button press or button combination on the handset. Keep the remote close to the box during this first exchange, even though normal use may work through bedding and at different angles.
IR handsets need line of sight. Point the top of the remote toward the receiver and remove anything blocking the signal. If the handset has no visible pairing process, test it near the receiver rather than assuming the batteries or motor have failed.
Bluetooth models use a manufacturer's app. One app listing describes control of one stand-alone Twin XL bed, or two Twin XL units in a Split King arrangement when the frames are connected by cable. Another example uses a Flexabed control box that remains in pairing mode for 60 seconds while the app connects to an OKIN receiver. The app listing shows how connected controls differ from traditional handsets.
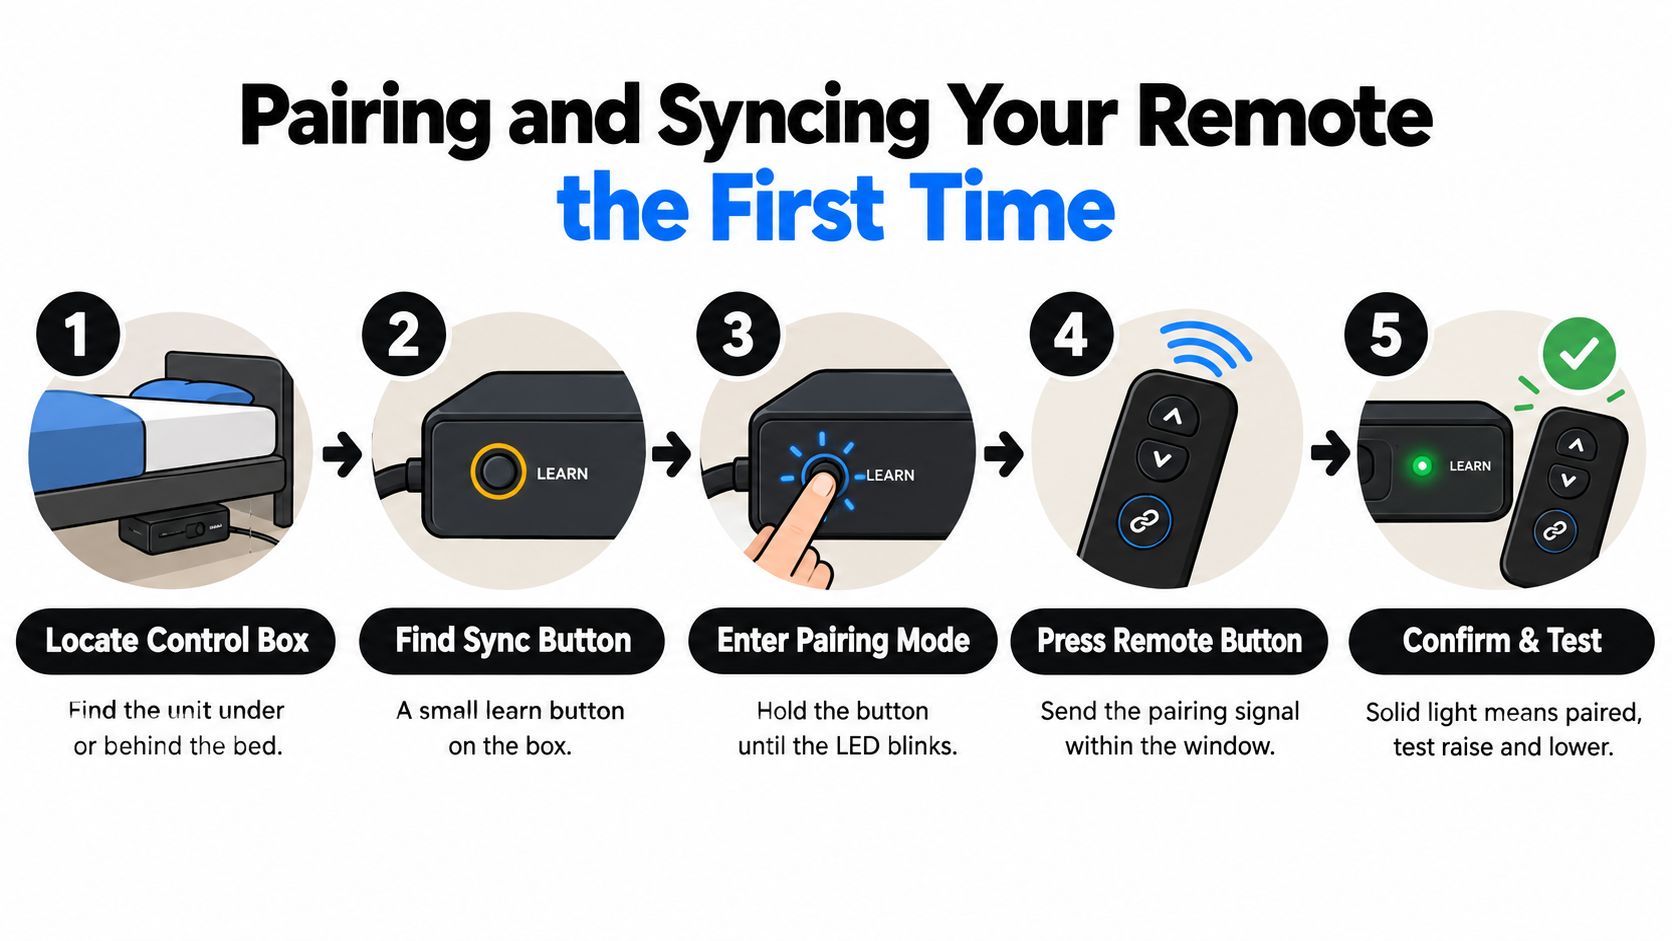
After pairing, test head up, head down, foot up, foot down, and any combined preset separately. The LED can confirm communication, but only motor movement confirms that the complete command path works. If the receiver won't accept the signal, unplug the bed, wait, restore power, and check that the handset matches the control box before repeating the pairing process.
Battery Replacement and Routine Care
Battery changes are maintenance, not proof that the remote itself has failed. Slim modern handsets often use a coin cell, traditional pendant-style controls commonly use two AAA batteries, and some less common designs use a rechargeable pack that sits in a charging cradle.
Look for the compartment on the back or lower edge. A slim remote may have a slide-off cover, while a pendant may use a small screw-secured tray. Remove the batteries and inspect the contacts before installing replacements. White or green residue, a damp compartment, or a spring that has lost tension can prevent reliable contact even with fresh cells.
Confirm the swap at the bedside
Install the batteries in the correct direction, then check more than the indicator light. A brighter LED, quicker response, and immediate motor action are stronger signs that the handset has adequate power. If the light works but no function responds, stop treating the battery as the only suspect and move to the power and pairing checks.
Keep the handset dry. Clean the housing with a dry cloth, avoid liquid near buttons or seams, and don't modify wiring or attempt to clone an RF signal. Expert product guidance for low-voltage bed handsets emphasizes exact plug and receiver matching, dry cleaning, and replacement rather than improvised wiring changes. Many wired handsets use a 5 to 6 pin DIN-style cable, with common handset sizes around 128 × 40 × 17 mm to 185 × 60 × 22 mm and cable lengths near 1.5 m, so a similar-looking plug isn't enough to establish compatibility. This OKIN handset listing illustrates why the connector and receiver model matter.
A simple routine helps. Wipe the housing periodically, inspect for cracks, keep the remote away from spills, and store an appropriate spare battery at the bedside. For more practical battery-care ideas, see how to extend battery life.
Troubleshooting When the Remote Lights Up but the Bed Won't Move
A lit remote proves that some electrical power reaches the handset. It doesn't prove that the signal reaches the receiver, that the control box is powered, or that a motor channel can respond. Diagnose from the remote outward instead of buying a handset immediately.
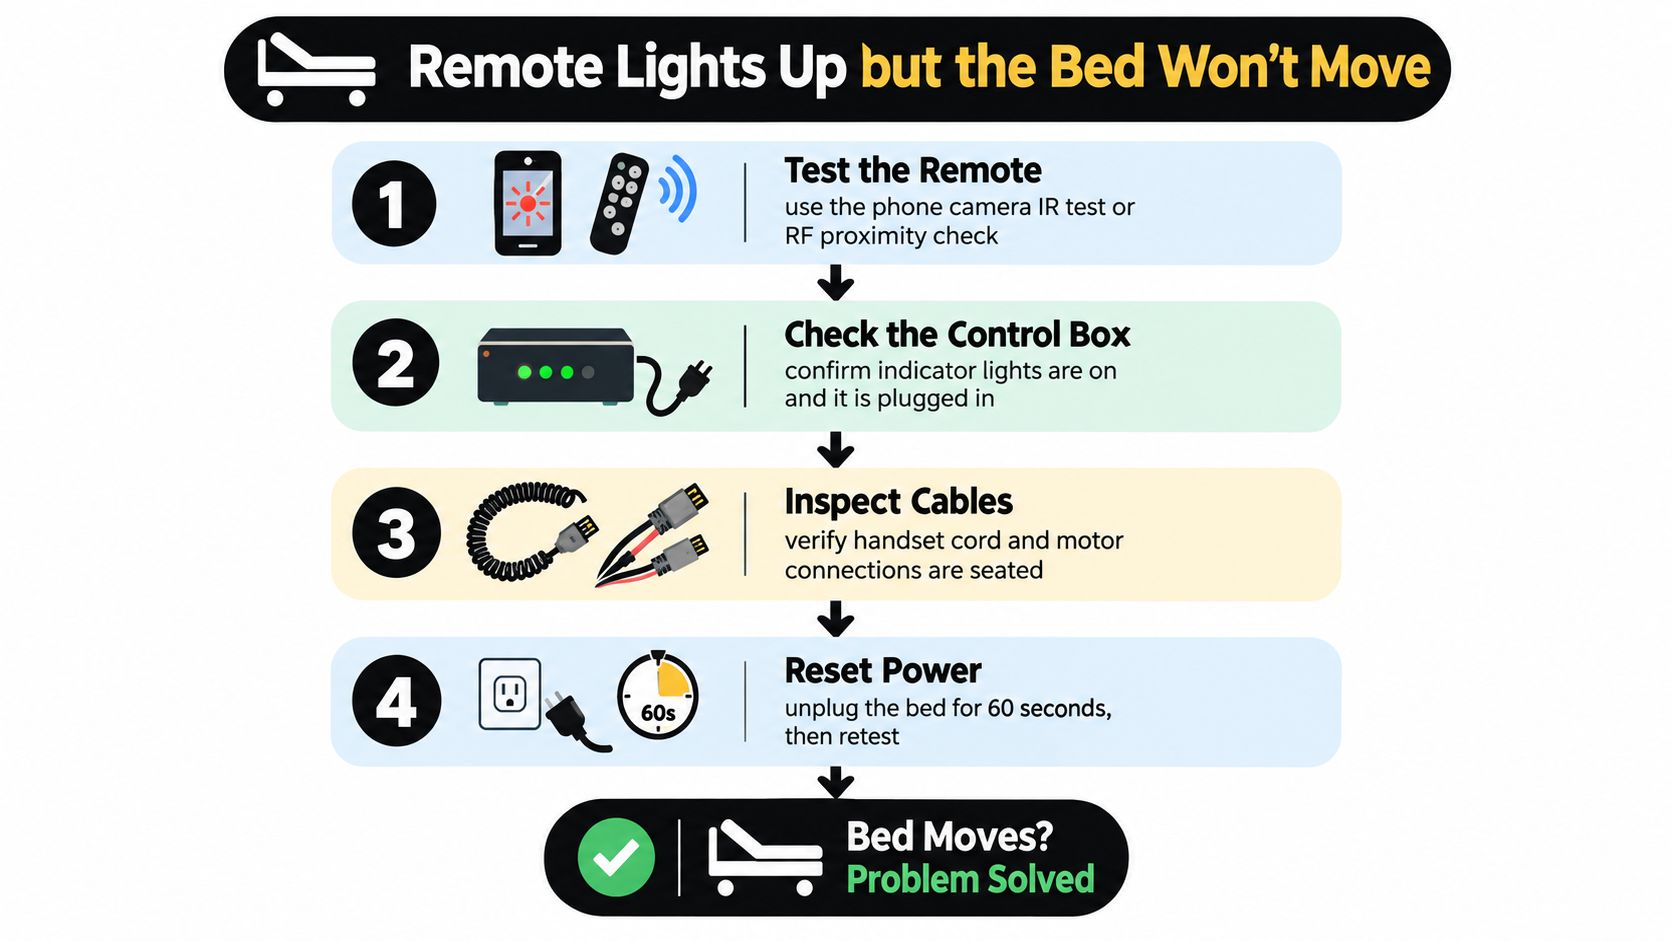
Use the symptom as the branch point
Start with the handset. If it uses IR, point it at a phone camera and press a button. Some phone cameras show a flicker from an active IR emitter, although this test isn't definitive for every device. For RF remotes, stay close to the bed and observe whether the control-box LED changes during a command. A light on the handset without any receiver response points toward pairing, transmission, or receiver trouble.
Next, confirm the bed's power path. Test the wall outlet with another device, check that the bed's plug is fully inserted, and inspect the power cord where it passes near the frame. Look for pinched, stretched, or damaged cables. Confirm that the control box has its normal indicator light, if the model provides one.
A working remote light does not establish that the bed is receiving commands.
Unplug the bed for 60 seconds, then restore power and retest. A power reset can clear a communication fault, but it won't repair a damaged lead, failed receiver, or seized actuator. Also check for a child-lock, travel-lock, or memory-lock setting. A locked handset can illuminate normally while blocking every movement command.
Isolate the motor channel
Test the head and foot sections independently. If the head works and the foot doesn't, focus on the foot motor, its cable, the relevant control-box socket, and the actuator itself. If both sections fail, investigate the outlet, power supply, receiver, control box, and lock setting before blaming two motors at once.
Listen and smell carefully. Grinding, repeated clicking, a hot electrical odor, or unusual transformer noise suggests a mechanical or electrical fault. Don't open the control box or touch internal components. The bed uses mains power at the supply side, and internal repairs belong to a qualified technician.
For a related example of symptom-based remote diagnosis, review this guide on troubleshooting lift-chair remotes. The same principle applies: identify which commands work, then isolate the component shared by the failed functions.
If the remote is dead, replace or test the batteries first. If it lights but the receiver stays silent, investigate pairing and power. If one button or one movement fails, suspect that channel or actuator. If a known-compatible handset also fails, replacing another remote is unlikely to solve the problem.
Choosing a Compatible Replacement Remote
A replacement decision should begin with the control box label, not a marketplace photograph. Record the bed model, remote part number, control-box model, receiver information, and any FCC ID printed on the equipment. The brand name helps, but the internal control system determines whether the new handset can communicate.
You generally have three paths.
- Exact OEM handset: This is usually the lowest compatibility risk because it was designed for the identified bed and control box. It normally preserves the original button layout, pairing method, and tactile feel.
- Brand-specific or cross-brand universal: This can work when the frequency and control-box protocol match. “Universal” doesn't mean universally compatible, so verify the receiver and part number before ordering.
- App-based controller: Bluetooth or Wi-Fi control may help a caregiver who already manages the bed from a phone, but it adds charging, device access, and sometimes account or connection dependencies.
Compare the trade-offs
| Option | Compatibility Risk | Daily Usability | Typical Cost |
|---|---|---|---|
| Exact OEM handset | Lower when matched by bed and control-box model | Familiar buttons and direct bedside access | Varies by model and supplier |
| Brand-specific or compatible universal | Moderate to high if protocol details are unclear | Can offer simplified or redesigned controls | Varies by compatibility and features |
| App-based controller | Depends on Bluetooth, Wi-Fi, app, and receiver support | Useful for phone users, less convenient for someone who needs a dedicated tactile control | Varies by system and required accessories |
For older adults, arthritis, or low vision, button spacing and surface texture may matter more than presets. A handset with clearly separated head and foot controls can reduce mistakes in a dark room. Caregivers should also consider where the remote will live, whether the user can hold it comfortably, and whether charging a phone creates more work than using replaceable batteries.
Think beyond the purchase price. Over several years, an app may require a compatible phone and regular charging, while an OEM handset may require batteries but remain independent of a wireless network. A universal may look attractive until a failed pairing forces another purchase. A useful adjustable bed base quality buyer's guide can help you evaluate the base and its control ecosystem together rather than judging the remote in isolation.
A working compatible handset is also a diagnostic tool. If another known-compatible remote operates the bed, the original handset is the likely failure. If no compatible handset works, contact the manufacturer or a DME supplier before ordering more parts, especially when the system uses firmware-locked receivers.
For replacement options connected with home-care seating equipment, DME Superstore also lists Golden Technologies lift-chair remote replacements. Confirm the equipment category and connector before applying any replacement listing to an electric bed.
Safety, Duty Cycles, and Bed Rail Awareness
The remote can start movement, but safe operation depends on the entire bed setup. Check the duty-cycle information on the control box or in the manufacturer's documentation before repeated repositioning. Some platforms specify a 2-minute ON and 18-minute OFF duty cycle, so holding buttons through long, repeated movements can overheat or stall the system. The Floore bed instructions also show how higher-end systems may specify 24 VDC control circuitry, ingress protection from IPX4 to IP66, and electromagnetic immunity requirements such as ±8 kV contact ESD, ±15 kV air discharge, 3 V/m radiated RF immunity, and fast-transient or surge tolerance up to ±2 kV on feeder lines.
Those figures aren't decorative. They describe how the equipment is expected to tolerate moisture, static discharge, nearby wireless equipment, and electrical disturbances. Users shouldn't treat them as permission to spray cleaner on the handset or operate damaged equipment.
Keep movement and care equipment compatible
Unplug the bed before cleaning a spill near the power supply or control box. Route a wired remote cable away from moving joints and actuator paths, and place the handset where a confused or sleeping user won't accidentally activate a movement command. Don't overload the outlet behind the bed or daisy-chain power strips.
Bed rails require a separate safety assessment. The FDA's guidance for adult portable bed rails advises consumers and caregivers to check compliance with ASTM F3186-17, follow the manufacturer's installation instructions, secure the permanently attached safety strap or retention system to the bed frame, and prevent gaps wide enough to entrap a head or body.
Health Canada warns that rails can cause strangling, suffocation, injury, or death when a person becomes caught between the rail, mattress, or bed. Its practical guidance includes keeping the bed low with wheels locked, using the correct mattress size, and reducing gaps. The UK Health and Safety Executive recommends a competent person carry out a risk assessment, while UK government bed-rail guidance gives a maximum gap of 60 mm between rail bars.
Before changing a mattress, rail, or bed position, reassess the gaps and the user's needs. This bed-rail installation resource can support the equipment review, but manufacturer and clinician guidance should control the final setup.
Quick Decision Checklist Before You Buy or Replace
An electric bed remote is a working component that will eventually need care, testing, or replacement. Before you spend money, run this short bedside audit.
- Photograph the labels. Capture the bed model, control-box label, receiver information, remote part number, and any FCC ID. Don't rely on memory or a product photo.
- Identify the transmission method. Determine whether the system uses RF, IR, Bluetooth, or a wired handset. Pairing instructions and replacement choices depend on this detail.
- Test every button. Record which commands work and which fail. A working head function with a dead foot function points toward a channel or actuator issue, not automatically a bad handset.
- Inspect the housing and cable. Look for cracks, liquid entry, loose buttons, bent pins, frayed insulation, and crushed sections near the moving frame.
- Check the seller's warranty and return terms. A remote that doesn't match the control box won't become compatible because it fits the hand.
- Document normal operation. Note the usual head, foot, preset, and accessory responses so a later failure has a clear baseline.
Choose repair, replacement, or upgrade
Repair is reasonable when one or two buttons fail but the housing, contacts, and cable remain intact and the manufacturer supports the part. Replace the handset when it is physically damaged, completely unresponsive after power and pairing checks, or discontinued with no supported repair path. Upgrade only when app control, caregiver lockout, or additional functions solve a genuine care need.
The same discipline helps when comparing a complete bed system. A practical buying guide for adjustable beds can help you assess the frame, mattress compatibility, controls, and support before treating the remote as an isolated purchase.
For home-care equipment and compatible accessories, DME Superstore offers electric beds, lift chairs, manuals, replacement parts, and other durable medical equipment with product specifications and support options. Visit the store with your control-box photo and remote part number ready, so you can compare the correct replacement instead of guessing from appearance.
