



Getting a loved one from a chair to a toilet, wheelchair, or bed can feel simple until the day it isn't. One shaky rise from a recliner can turn into a near fall, a pulled lower back, or a transfer that takes two people and still doesn't feel safe. That's usually the moment families start asking about a sit to stand patient lift.
The confusion starts fast. Some people think it's just a powered standing aid. Others assume it works like a full-body Hoyer lift. It doesn't. A sit to stand lift only fits a specific kind of transfer. When it matches the person, the room, and the caregiver, it can make mornings calmer and safer. When it doesn't, it can create exactly the kind of unstable transfer you were trying to avoid.
A Real Morning in a Home With a Lift
At 7:15 a.m., a daughter is helping her father up from his recliner so he can get to breakfast and then to the bathroom. He's alert. He wants to help. His legs still push a little, but not enough to rise safely on his own. She's learned to brace his knees, count out loud, and try not to twist as she helps him stand. By the time he's upright, her back already hurts.
That's the kind of moment a sit to stand lift can change.
Instead of one person doing a rushed manual lift, the transfer becomes a set sequence. Feet go onto the footplate. Knees meet the pad. The sling supports the trunk. The lift provides the upward force the legs can't fully supply. The motion is more predictable, and the caregiver doesn't have to “catch” the patient halfway up.
Why this matters at home
Families often think the main question is, “Which lift should I buy?” The better question is, “Is this the right type of lift for the person I'm helping?”
That distinction is part of CQC ready person centred care. Good care starts with the person's actual abilities, routines, and risks. A device should fit the patient's mobility level, the caregiver's physical capacity, and the layout of the home.
At the bedside, the safest transfer is usually the one that feels the least dramatic. Calm, repeatable movement beats heroic lifting every time.
Where caregivers get tripped up
Three misunderstandings come up again and again:
- It looks easier than it is: A sit to stand lift still requires setup, positioning, and patient participation.
- It isn't a universal lift: If someone can't bear weight or can't follow directions, this may be the wrong device.
- Specs alone don't answer the question: Capacity, width, and turning room only matter if they match the bedroom, bathroom, and patient in front of you.
What a Sit to Stand Lift Is and How It Works
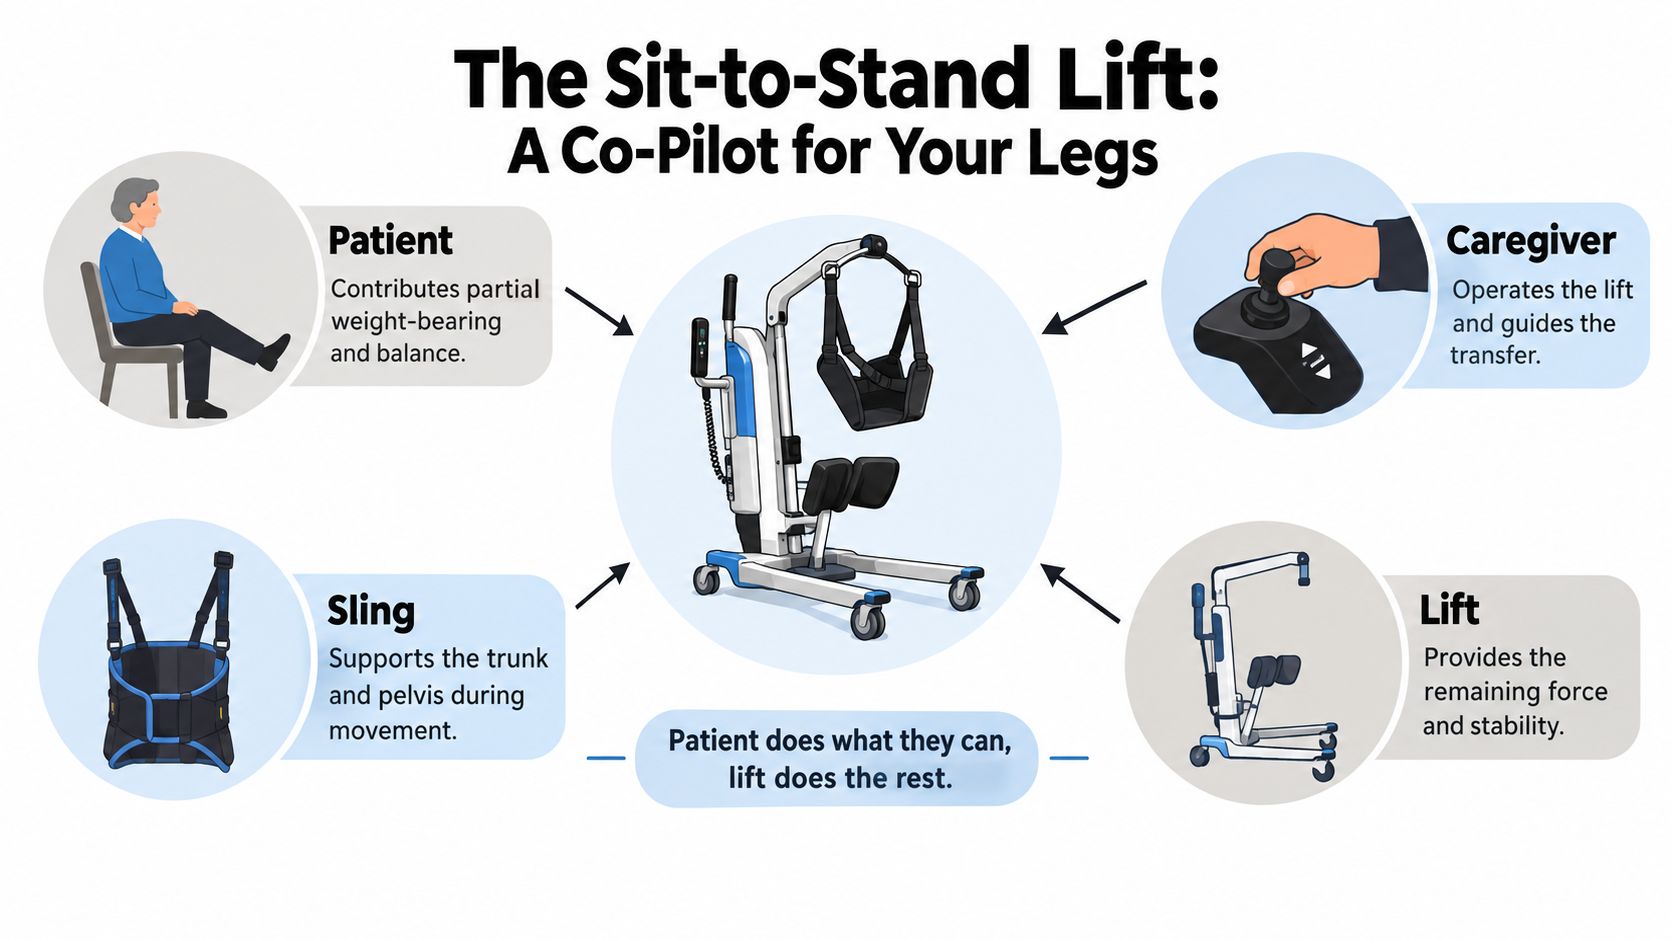
A sit to stand lift is easiest to understand as a co-pilot for the legs. The patient does part of the work. The lift does the rest. It isn't carrying a fully passive person in a suspended cradle. It's assisting the rise from sitting into a supported standing posture.
The four parts working together
Think of the transfer as four moving parts:
- The patient supplies some weight-bearing, balance, and cooperation.
- The caregiver positions the device, applies the sling, and controls the movement.
- The sling wraps behind the back and under the arms or around the trunk, depending on design.
- The lift frame provides the lifting force and includes the footplate, knee support, and attachment points.
The patient places their feet on the footplate. Their knees or shins contact the support pad. The sling attaches to the lift arm or cradle. As the lift rises, the person is guided forward and upward into a supported stand.
Why it's different from a full-body lift
A full-body lift cradles a patient who can't stand or help with the movement. If you need a quick contrast, this guide on what a Hoyer lift is used for explains the role of a full lift more clearly.
A sit to stand lift belongs in a narrower lane. Research on a portable lifting-seat device found that the sit-to-stand transition took 2.30 seconds with the lift walker versus 3.79 seconds with a control walker, a 39% reduction in transition time in healthy older adults, and the same body of work found supported body weight increased from about 60% to almost 100% as users were lifted higher (biomechanical study). That helps explain the device's purpose. It supports part of the standing task, and support changes with lift height.
Practical rule: The more the device has to act like a full passive hoist, the more likely you're using the wrong category of lift.
Main Types of Sit to Stand Patient Lifts
When families compare models, they usually aren't choosing between “good” and “bad” lifts. They're choosing between trade-offs. Portability, power source, turning space, and transfer frequency all matter.
Comparing Sit to Stand Lift Types
| Lift Type | Best For | Key Trade-Off |
|---|---|---|
| Mobile floor lift | Homes and facilities needing room-to-room flexibility | Takes floor space and must be maneuvered around furniture |
| Ceiling-mounted system | Fixed transfer routes used repeatedly in the same spaces | Requires installation and only serves the track path |
| Manual hydraulic sit to stand lift | Lower transfer volume and settings where charging is inconvenient | More caregiver effort during the lift |
| Powered sit to stand lift | Frequent daily transfers and caregivers who need reduced lifting effort | Heavier equipment and battery charging become part of the routine |
| Stand-aid style device | Users with stronger participation and short standing transfers | Narrower candidate group than a powered sling-based lift |
Mobile versus fixed systems
A mobile floor lift is what most families picture first. It has a wheeled base, a mast, a lift arm, and either manual or powered raising. It can travel between bedroom, bathroom, and living room if the floors and doorway widths allow it.
A ceiling-mounted system makes more sense when transfers happen along the same route every day. It reduces floor clutter, but it asks more from the home itself. You need the right installation path and enough confidence that care routines won't change much.
Manual versus powered movement
Manual hydraulic models can work well in the right setting, but the caregiver becomes a bigger part of the lifting process. Powered models reduce that effort, though they add battery management and often more unit weight.
If you're comparing stand-assist styles and powered compact lifts, this side-by-side look at Sara Stedy vs Hoyer Up is useful because it frames the devices around transfer style, not just product category.
- Ask about daily volume: A few transfers a week creates different demands than repeated bed-chair-toilet moves every day.
- Ask about route complexity: A straight path across open flooring is easier than a tight bathroom turn around a vanity.
- Ask who will operate it: A powered lift may fit better if the main caregiver has shoulder, wrist, or back limitations.
Weight Capacity, Sizing, and Fit Numbers Explained
Spec sheets can look technical, but most of the numbers answer basic bedside questions. Will it hold the person safely? Will it fit around the chair? Can it turn in the bathroom without becoming a wrestling match?
What the numbers really mean
Published specifications show that modern sit to stand lifts commonly have safe working loads around 200 kg/440 lb. One documented active-lift model lists 200 kg active lift and 150 kg passive lift, a base width expanding from 690 to 1115 mm, unit mass of 45.2 kg, and lifting speeds of 54 mm/s or 47 mm/s depending on slingbar setup. Another documented model lists 200 kg maximum load, 16 mm/s raising speed, 30 kg total weight, and a 110 cm turning radius (technical specifications).
Those numbers matter because they describe three things at once:
- how much load the frame is built to handle,
- how much floor space the base needs,
- and how quickly the transfer happens.
Sit to Stand Lift Specifications Translated to Real Use
| Specification | Typical Range | What It Means in Practice |
|---|---|---|
| Safe working load | Around 200 kg/440 lb in common documented models | Capacity has to match the user and sling, with room for real-world movement during transfers |
| Base width | Some models expand from 690 to 1115 mm | A wider open base can improve stability, but it also affects furniture access and turning room |
| Unit weight | Documented examples include 30 kg and 45.2 kg | Heavier units may feel steadier but can be harder to steer in carpeted or tight spaces |
| Raising speed | Documented examples include 16 mm/s, 47 mm/s, and 54 mm/s | Faster lifts shorten the rise, but caregivers have less time to correct posture mid-transfer |
| Turning radius | Documented example of 110 cm | This tells you whether the lift can rotate where the transfer actually happens |
Translating fit into the room
A base that opens wider may improve anti-tip stability under uneven loading. A lower floor clearance can help the legs slide under beds or chairs. A tighter turning radius matters most in bathrooms and in bedrooms crowded by dressers or lift chairs.
For body-size questions, it also helps to think about the seated equipment around the lift. A user's wheelchair width, leg position, and body shape all affect how well the lift lines up with the footplate and knee support. This overview of bariatric wheelchair width helps caregivers think through surrounding equipment, not just the lift itself.
Who a Sit to Stand Lift Is Right For
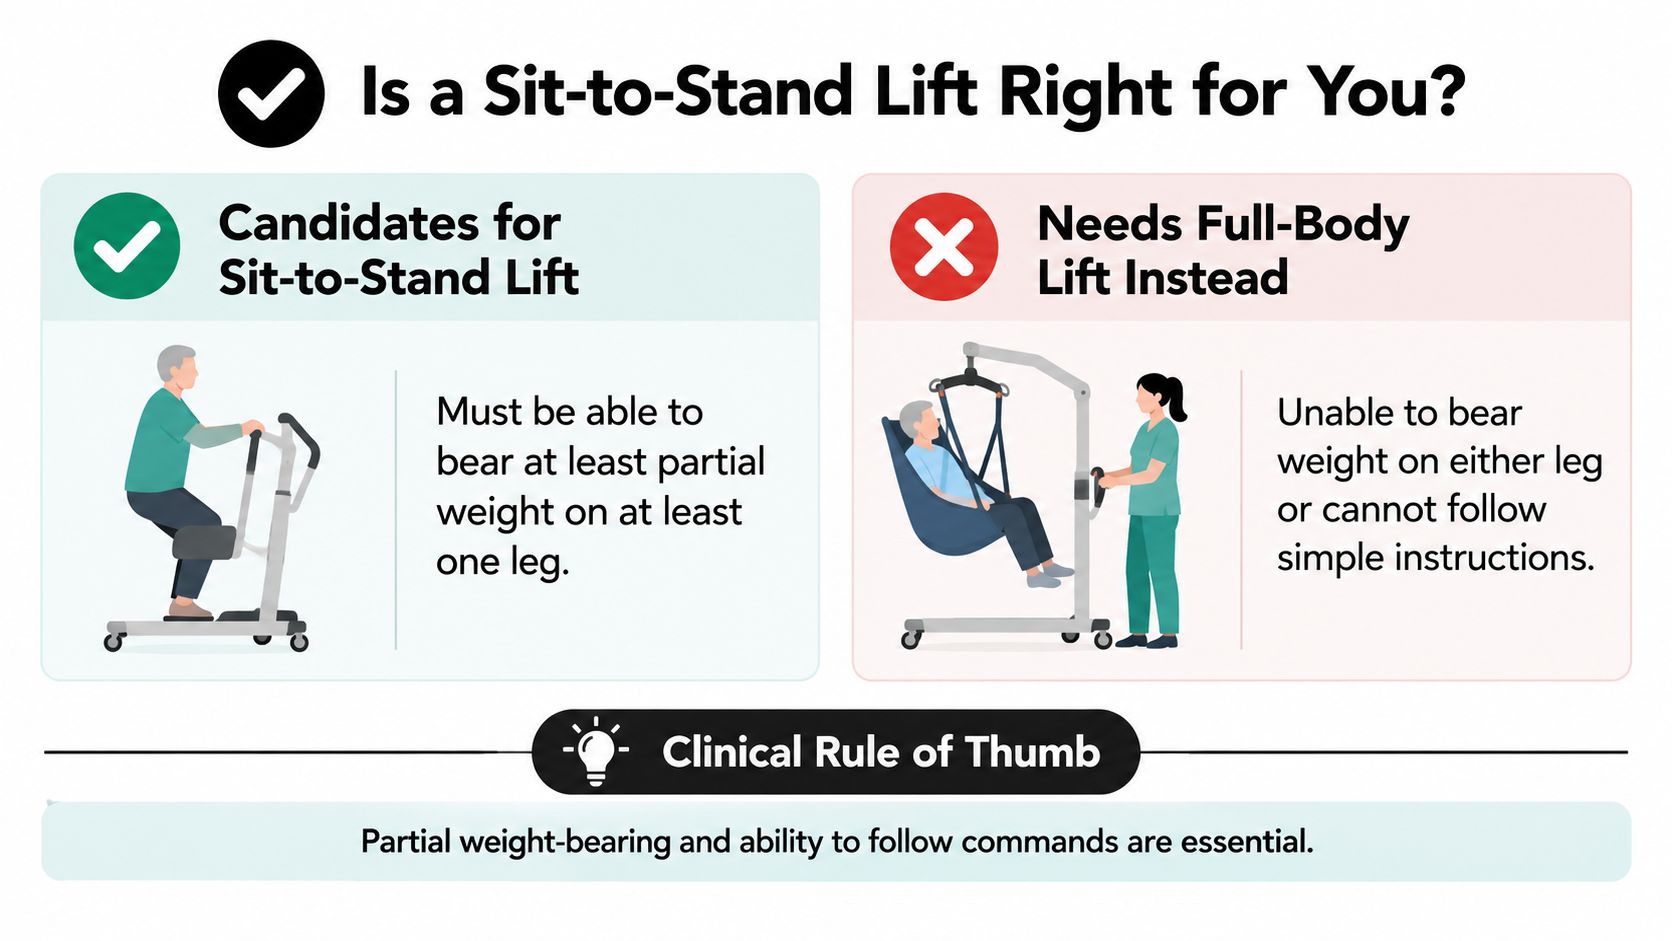
This is the decision point that protects both patient and caregiver. A sit to stand lift is not just for anyone who has trouble standing. It's for someone who can still do a meaningful part of the movement.
The minimum participation that matters
Independent safety guidance says the person should support the majority of their own weight, with one procedure specifying at least 35% lower-extremity weight bearing and another recommending use only when the client can stand steady for about 20 seconds (safety checklist). Workplace and medical guidance also commonly require partial weight-bearing of 30–60%, the ability to hold onto the lift, maintained cooperation, and in one policy the ability to move from supine to sitting and balance at the edge of the bed before using the lift (patient handling resources).
A practical handling threshold also shows up in guidance. The CDC/NIOSH recommended that if a caregiver must lift more than 35 lbs. (16 kg) of a patient's weight during handling, the patient should be considered fully dependent and an assistive device should be used (CDC/NIOSH patient handling guide). A Washington State safety guide says a client should use a sit-to-stand lift if the lift effort is not less than 35 pounds (Washington transfer guide).
Good fit versus poor fit
A good candidate usually has these features:
- Some weight-bearing ability: The legs contribute enough force to unload part of the transfer.
- Trunk control: The person can stay upright rather than collapsing forward or sideways.
- Cooperation: They can follow simple cues from start to finish.
- Handle tolerance: They can hold the lift appropriately if the model requires it.
A poor candidate often shows the opposite pattern. Published work procedures say these devices are unsuitable if the person cannot cooperate consistently, cannot weight-bear consistently, or has limited ability to participate in the lift/transfer (work procedure for mechanical sit-to-stand transfer).
The diagnosis matters less than the movement. One person with Parkinsonian slowing may do well. Another person with a recent illness and almost no leg loading may need a full-body lift instead.
Transfer Technique and Precautions Step by Step
The safest transfers are boring in the best way. Everyone knows the sequence. The patient knows what's coming. The caregiver doesn't improvise halfway through.
A broader review of safe patient transfer techniques can help if you're building a home routine from scratch.
The setup before the lift moves
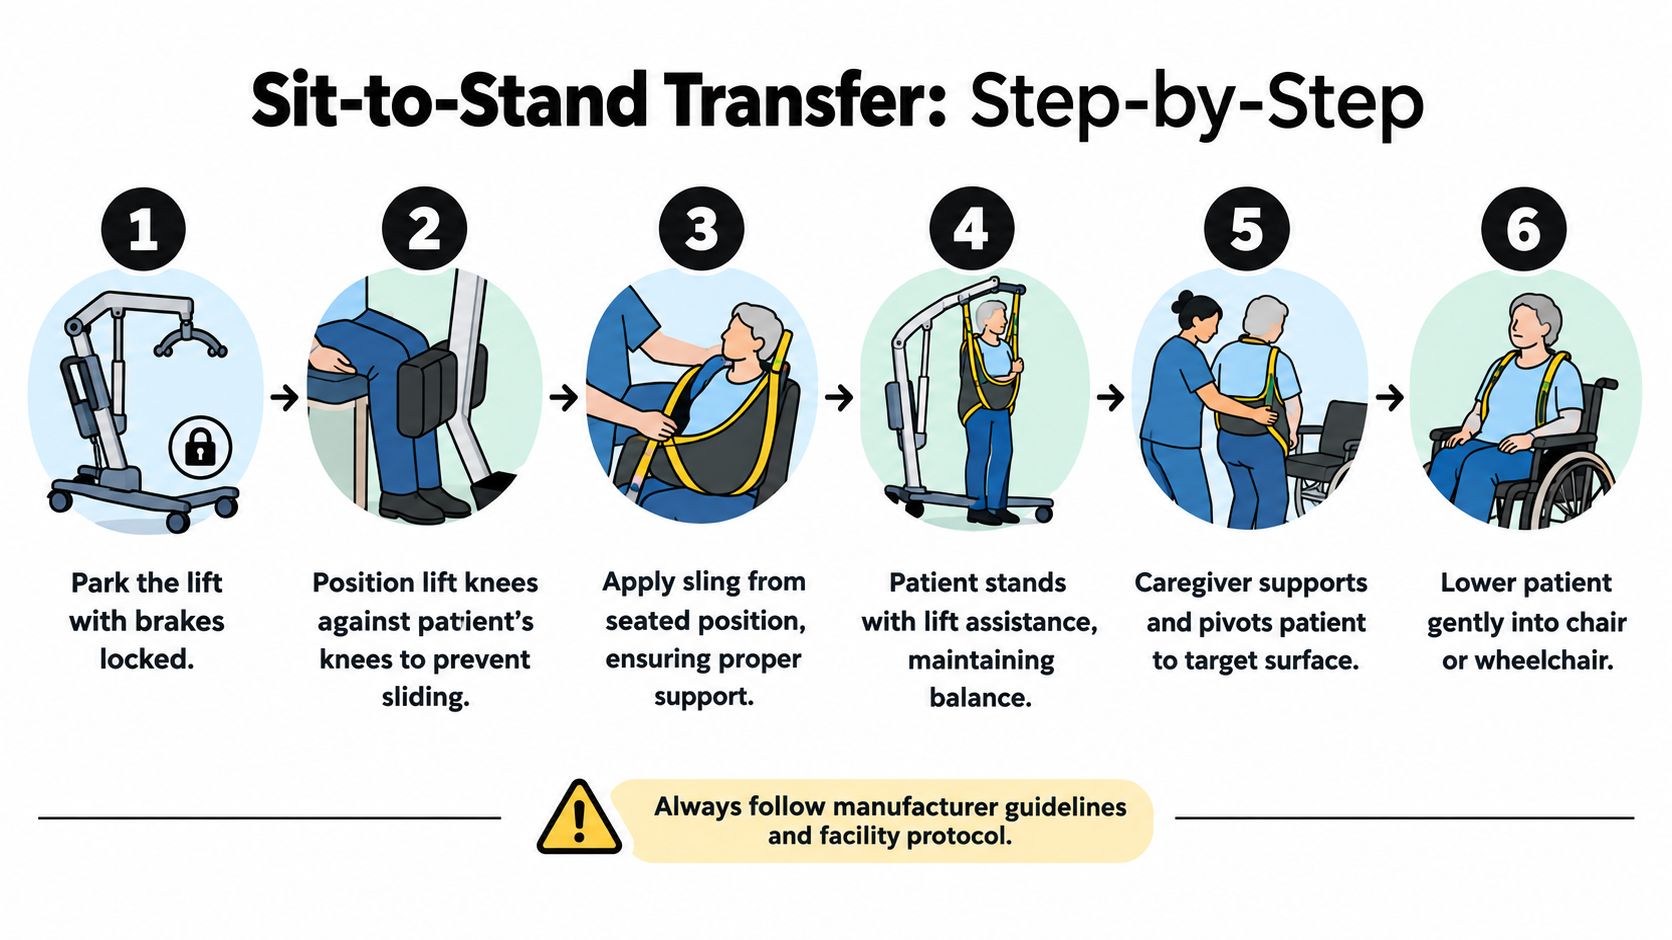
- Position the destination first. Before you start, place the wheelchair, commode, or chair where you want it.
- Bring the lift in close. Center the patient's feet on the footplate and line the lower legs up with the knee support.
- Apply the sling carefully. From sitting, place the sling behind the back and secure it as designed for that model.
- Attach every loop correctly. Double-check left and right sides before raising.
The common mistake here is rushing because the patient is tired or anxious. Most transfer trouble starts before the lift arm even rises.
The movement itself
When the patient is ready, raise only enough to clear the seat. The goal is a controlled supported stand, not an unnecessary high lift. Keep the feet flat on the footplate and watch the knees stay in contact with the pad.
This demonstration can help caregivers visualize the sequence in motion:
Then guide the lift toward the destination. Lower slowly until the patient's weight is fully supported by the seat before removing sling attachments.
Precautions that prevent the usual problems
Recent ergonomics discussion highlights setup, staffing, and maneuvering force as real parts of safety, not side issues. One guideline recommends two caregivers depending on patient size, weight, and capability, and a clinical chapter notes sit-to-stand transfers may be completed with one or two assistants depending on therapist and agency policy. A 2024 study also concluded that another caregiver or a motorless stand-up lift can reduce caregiver loading during sit-to-stand handling (ergonomics review and simulation discussion).
Use that context to avoid the mistakes caregivers make most often:
- Don't treat one-person use as a rule: Staffing depends on the patient and the space.
- Don't leave someone suspended: Even a brief interruption can become a fall risk.
- Don't let the feet drift: Poor foot placement changes the whole lift path.
- Don't turn it into a sideways drag: Guide the device. Don't pull the person laterally while supported.
Therapy, Compliance, and Purchasing Considerations
A sit to stand lift isn't only a transfer tool. In the right patient, it can also support standing practice and repeated daily mobility work. In the wrong patient, it becomes a compliance and safety problem.
Therapy use versus transfer-only use
Therapists often think about these lifts in terms of task participation. The patient isn't just moved from point A to point B. They rehearse parts of standing, posture, and weight acceptance during real daily activity.
That only works when the person can safely participate. One nursing review notes that sit-to-stand devices support a person while they stand and are selected based on therapist assessment and agency policy, while transfer guidance notes that manual assistance or a sit-to-stand device may be appropriate for partially dependent patients rather than a full lift (clinical review of transfer guidance).
Renting, financing, or buying
A short rehab period creates a different decision from long-term progressive illness or a multi-user care setting. The practical choice usually comes down to how certain you are about duration, how often the lift will be used, and whether the patient's mobility level is likely to change.
| Factor | Renting | Financing | Buying Outright |
|---|---|---|---|
| Best fit | Short recovery periods or trial use | Longer home use when spreading cost matters | Ongoing heavy use or stable long-term need |
| Upfront commitment | Lower | Moderate monthly commitment | Highest initial commitment |
| Flexibility if needs change | Higher | Moderate | Lower unless resale or exchange is possible |
| Service planning | Often handled through rental process | Depends on supplier terms | Owner must track maintenance and support |
| Good question to ask | “What happens if the patient outgrows this model?” | “What's covered during the payment term?” | “Who services the lift and sling locally?” |
Home reality matters more than the brochure
Keep a simple checklist:
- Doorways and floor surfaces: Tight thresholds and thick carpet change maneuvering.
- Storage footprint: The lift needs a home when it isn't in use.
- Caregiver training: The right model still fails if no one feels confident using it.
- Inspection habits: Sling wear, battery charging, and routine checks need an owner.
This is also where actual product comparison helps. In the home-care market, examples include compact manual models such as the Joerns Hoyer UP Sit-to-Stand Compact Manual Patient Lift and powered options such as the Joerns Hoyer Journey Sit-To-Stand Folding Electric Patient Lift, both available through DME suppliers including DME Superstore.
Choosing the Right Lift With Confidence
By the time families feel ready to order a lift, they're often tired and under pressure. That's exactly when a simple decision filter helps. You don't need every feature. You need the right match.
Four match criteria that matter
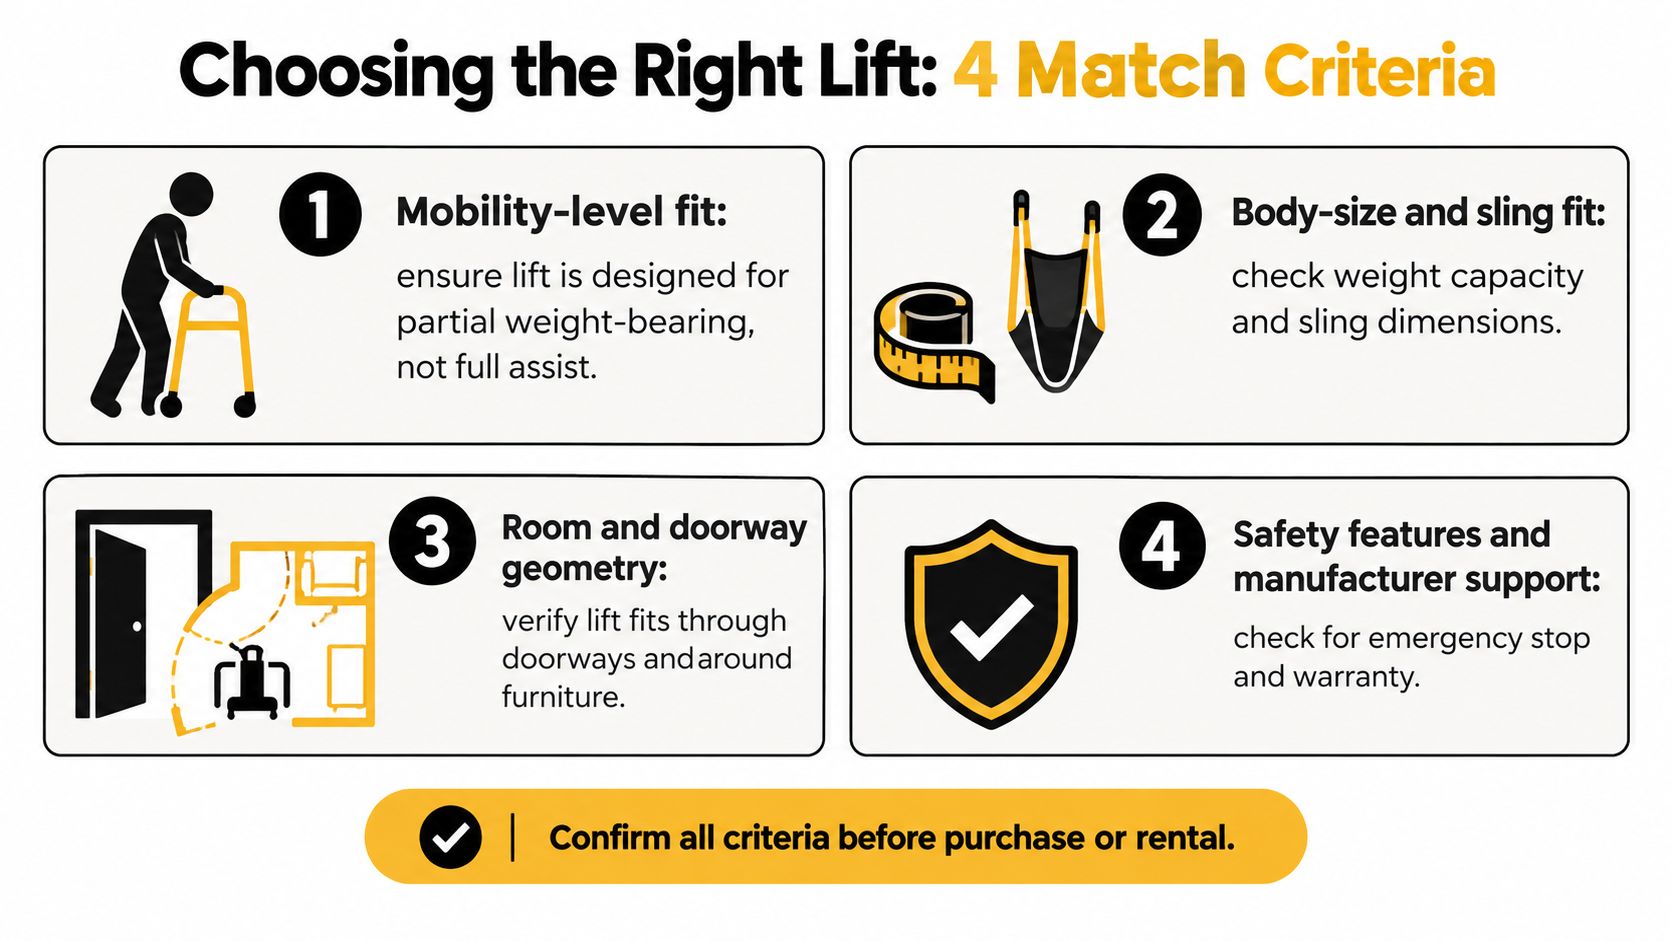
Use these four checks before committing to any sit to stand patient lift:
- Mobility-level fit: Confirm the person is in the partial-weight-bearing group this device is built for.
- Body-size and sling fit: Match the patient's build, trunk control, and skin needs to the sling and frame.
- Room geometry: Measure the narrowest doorway and the tightest turn, not just the open living room.
- Caregiver workflow: Be honest about who will use it, how often, and whether one helper is enough.
If you're comparing transfer tools beyond this category, this guide to a patient transfer device can help sort where a sit to stand lift fits among other options.
The next steps that prevent buyer's remorse
A good decision usually follows this order:
- Get an in-home assessment from a therapist or qualified mobility professional.
- Trial the lift with the actual patient and the actual sling size.
- Measure the route from bed to bathroom to favorite chair.
- Write down the transfer method so every caregiver uses the same setup.
Buy the lift that matches the person's movement, not the lift with the longest feature list.
When those pieces line up, a sit to stand lift stops being intimidating equipment and becomes what it should be: a steady, repeatable way to help someone stand with less fear and less strain.
If you're comparing sit-to-stand options for home or facility use, DME Superstore offers patient lifts, transfer aids, and related homecare equipment with detailed product specs that can help you sort out fit, capacity, and use case. It's a practical place to compare manual and powered models, check compatibility details, and narrow down which lift belongs in your actual care setting.
