



The hospital discharge date is circled on the calendar. Your parent needs to get through the front door, a new power chair is arriving, and the porch is higher than it looked from the driveway. A ramp that seems like a simple strip of material can quickly become a daily obstacle if the slope, landing, drainage, and doorway aren't planned together.
Good wheelchair ramp design starts with the person using it, not the product brochure. A manual wheelchair user, a caregiver pushing from behind, and someone operating a long-wheelbase power chair may need very different layouts. The safest design often uses more space and costs more than the cheapest compliant option, but it also works when the user is tired, the landing is wet, or the door has to be opened from the chair.
Why Wheelchair Ramp Design Decisions Matter from Day One
A family may order a ramp after a hospital stay and focus on the quickest installation. That urgency is understandable. The problem is that a ramp can satisfy a slope rule and still fail at the exact moment someone needs it most.
One family might install a maximum-slope ramp for a parent who can no longer propel a manual chair independently. Another might discover that rainwater runs toward the bottom landing, leaving a slick surface after every storm. A third might have a top landing that looks adequate until the user must stop, turn, reach for the door handle, and keep the chair from rolling backward.
The main incline is only one part of the access route. Approach angle, landing size, door swing, threshold transition, cross slope, edge protection, and drainage all affect whether the ramp works in daily life. Home-access research also identifies inaccessible doorways and inadequate wheelchair turnaround space as recurring barriers, which means a ramp alone may not solve the entrance problem. Research on wheelchair access barriers is useful because it keeps attention on the route around the ramp, not just the ramp surface.
Practical rule: If the user can't approach the ramp straight on, stop safely on the landing, open the door, and clear the threshold, the design isn't finished.
Before ordering materials, walk the route with the actual mobility device. Measure where the chair approaches, where it turns, and where the door opens. Check whether a caregiver has room to stand behind the chair without stepping off the edge. For broader planning, families can also find wheelchair friendly floor plans that account for circulation and entry access from the beginning.
A ramp can also expose problems elsewhere in the home. Door widths, thresholds, bathroom access, and transfer areas may need attention alongside the exterior route. DME Superstore's guide to home modifications for wheelchair users can help you assess those connected changes instead of treating the ramp as an isolated purchase.
Ask these questions before you choose a layout:
- Who uses the ramp: Is the person independent, assisted, using a scooter, or operating a power chair?
- What happens at the door: Can the user reach the handle without rolling backward or blocking the swing?
- What happens in bad weather: Where do water, snow, leaves, and ice go?
- What changes later: Could the user move from a walker to a chair, or from a compact chair to a larger power device?
Those answers shape the design more reliably than a catalog description.
Measuring Rise and Planning Horizontal Run
Measure the finished rise first. Don't measure only the bare doorway or the top stair before the threshold, surface material, and transition are installed. The relevant measurement is the vertical distance from the lower driving surface to the finished upper landing.
Use a level and tape measure. Place the level on the upper landing, extend it horizontally over the lower surface, and measure straight down to the finished driving surface. Include the height created by the threshold and any planned surface layers. An incorrect rise produces an incorrect ramp length, and a ramp that is too short becomes too steep.
Use the rise-first calculation
At the ADA maximum 1:12 slope, every 1 inch of vertical rise requires at least 12 inches of horizontal run, and any individual ramp run is capped at a 30-inch rise before an intermediate landing is required. The U.S. Access Board ramp guidance provides the underlying geometry and design requirements.
For a finished 24-inch rise:
- Measure the rise, 24 inches.
- Multiply 24 by 12.
- Plan for at least 288 inches of horizontal ramp run.
- Convert 288 inches to 24 feet.
- Add the required level landings and any turning space.
That 24 feet describes the sloped run, not the full footprint. If the route changes direction, the landing takes additional space. If the total elevation is greater than 30 inches, divide it into separate runs with an intermediate level landing rather than creating one continuous incline.
Plan the route, not just the length
A 24-inch porch may not allow a straight 24-foot ramp. A switchback, L-shaped route, or modular configuration may fit better, but every change in direction needs a usable landing. Keep each run uniform, and don't let a transition create a sudden bump at the top or bottom.
The standards call for at least 36 inches of clear width between handrails where handrails are installed. Top and bottom landings should be at least as wide as the ramp and 60 inches long, while a change in direction needs a clear landing of at least 60 by 60 inches. Landings may slope no more than 1:48 for drainage, but they still need to feel level and stable under the wheels.
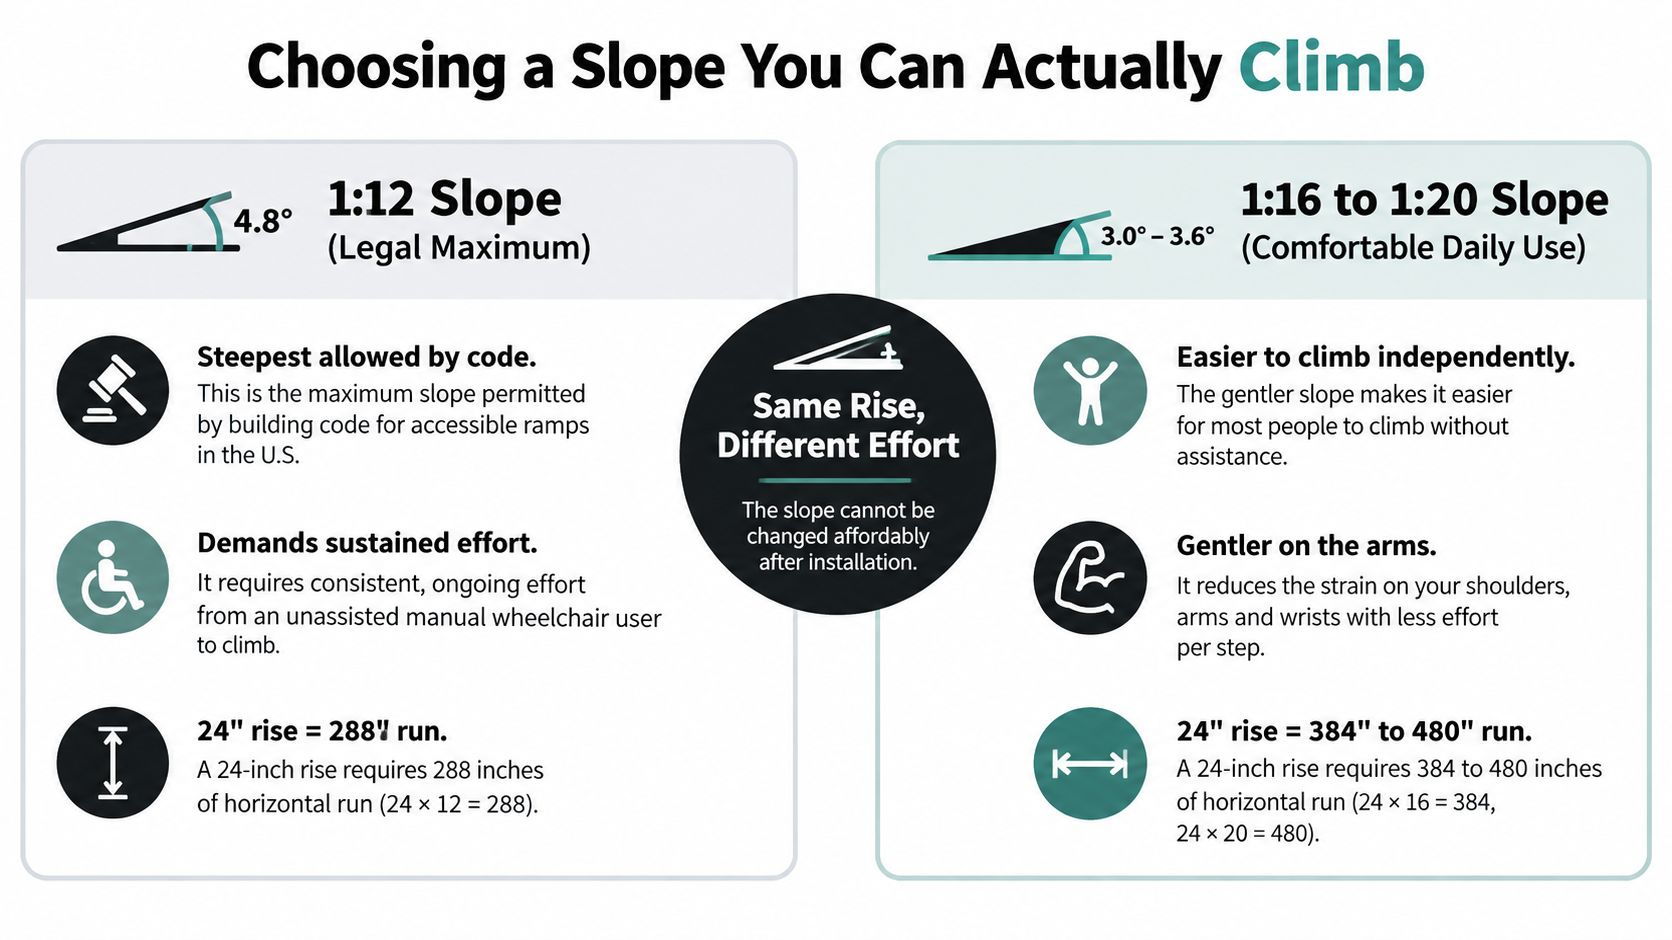
A gentler 1:16 to 1:20 slope can be worth the extra footprint for independent users, caregivers, and heavy mobility devices. Use the wheelchair ramp calculator guidance as a planning aid, then verify the finished rise and route on site before buying materials.
Choosing a Slope You Can Actually Climb
Treat 1:12 as a legal ceiling, not a comfort target. The ADA guidance recommends using the least possible slope, and notes that many wheelchair users can't manage a 1:12 ramp extending 30 feet. Gentler slopes between 1:16 and 1:20 reduce the pushing effort required by wheelchair users and attendants when the property has enough room.
A manual wheelchair user pushing alone feels every inch of incline. The user must generate sustained force while keeping the chair moving forward, and a steeper run can turn an ordinary entrance into a task that requires assistance. A caregiver pushing from behind also needs traction and room to control the chair without leaning dangerously into the slope.
Powered mobility doesn't remove every concern. A scooter or power chair may climb under its own power, but a longer wheelbase changes how the device meets transitions. A heavy power chair can also expose flex, vibration, or inadequate traction in a lightweight system. The right question isn't whether the device can reach the top. Ask whether it can stop, reverse, turn, and descend under control.
Keep both slope directions consistent
Running slope should remain uniform along each run. Abrupt grade changes can disrupt wheelchair travel and increase the risk of tipping or losing control. No unrelated level change should interrupt the run.
The cross slope matters too. The maximum cross slope is 1:48, approximately 2.08%, so the wheels don't drift sideways while the user climbs or descends. Even a small lateral tilt can make one wheel carry more of the load and force an unbalanced correction.

Use steeper exceptions only for small rises
Where an existing building has severe space constraints, a slope between 1:10 and 1:12 may serve a maximum 6-inch rise. A slope between 1:8 and 1:10 may serve only a maximum 3-inch rise, and slopes steeper than 1:8 are prohibited under the cited ADA framework.
Those exceptions aren't a default residential strategy. A short steeper segment may be workable for a small threshold and a consistently present caregiver, but it's a poor choice for an older adult, an unassisted manual wheelchair user, or someone using a heavy power device.
The slope you can't afford to change later is the one worth getting right before installation.
Before approving the layout, test the proposed route with the user's actual chair if possible. Check the approach, the transition, the stopping distance, and the descent. A longer ramp may occupy more yard space, but it usually creates a more forgiving daily route. DME Superstore's overview of wheelchair ramp requirements is a useful companion when comparing slope, width, surface, and landing decisions.
Landings, Width, Handrails, and Edge Protection
A ramp doesn't end where the incline ends. It ends when the user has a stable place to stop and can operate the entrance without fighting the chair.
Top and bottom landings should be at least as wide as the ramp and 60 inches long. At a turn, provide a clear landing of at least 60 by 60 inches. These dimensions aren't decorative. They give the user room to align the chair, pause, turn, and manage the next movement without placing a wheel near an edge.
Make the entrance usable
Check the door swing from the chair's final position. A door that swings outward can occupy the landing and push the user backward. An inward-swinging door may require the user to reach around a chair or hold position while pulling. The landing must also leave enough room to reverse safely without dropping a rear wheel toward the ramp edge.
Inspect the threshold as part of the ramp. A sharp lip, an uneven transition, or a landing that ends short of the door can defeat an otherwise careful slope calculation. If the user can't approach the threshold squarely, the entry needs redesign, not a stronger grip.
Build width and protection around the user
The minimum clear width between handrails is 36 inches. That's a baseline, not a promise that every user will feel comfortable. A wider route may be more practical for a power chair, scooter, bariatric equipment, or a caregiver walking behind the user.
Handrails should continue along the usable run and offer a secure, graspable profile. Edge protection keeps wheels from slipping off the side, especially when a user corrects course or a caregiver works from an awkward position. Don't rely on a visually obvious edge that provides no physical barrier.
Landings need drainage without becoming tilted platforms. Keep the landing slope within the 1:48 maximum cross-slope limit, direct water away from the door, and prevent standing water where the user stops.
For a do-it-yourself project, a guide to handrail hardware for DIYers can help you evaluate brackets, posts, and attachment choices. Use it as a hardware reference, then confirm that the finished rail system matches local requirements and the user's grip and reach.
DME Superstore's guidance on a wheelchair ramp with rails is also relevant when the ramp rises enough to require a continuous support system. The rail should support actual travel, not merely make the installation look complete.
Materials and How They Hold Up in Real Weather
Material choice changes how the ramp behaves under wet tires, summer heat, freezing conditions, and heavy equipment. Compare the surface you can maintain, not just the material you can install fastest.
Aluminum modular ramps are practical when installation speed, removability, or a rental-friendly setup matters. Prefabricated sections can suit portable and modular layouts, and textured surfaces can provide useful traction. Aluminum can feel cold in winter, absorb heat in direct sun, and flex if the system isn't properly supported or rated for the user's power chair.
Treated wood can blend naturally with a porch and offer a familiar surface for residential construction. It needs sound footings, rot-resistant framing, secure fasteners, and a slip-resistant tread. Water trapped around joints or posts can shorten its service life, while freeze and thaw cycles can shift supports or create uneven transitions.
Concrete offers a solid, permanent route with little routine movement once installed. It handles heavy equipment well, but the finish must provide traction when wet, and the surrounding drainage must be correct. Concrete also makes future changes difficult, so confirm the route, landing, and door relationship before pouring.
Residential ramp materials compared
| Material | Typical Cost | Slip Resistance | Install Time | Best For |
|---|---|---|---|---|
| Aluminum modular | Varies by configuration and load rating | Textured or grooved surfaces can improve wet traction | Usually faster than site-built work | Portable, rental, or reconfigurable access |
| Treated wood | Varies with framing, footings, and finish | Requires deliberate non-slip treads and upkeep | Site-built installation | Residential designs that need a custom appearance |
| Concrete | Varies with excavation, forms, and site preparation | Depends on the finished texture and drainage | More involved and permanent | Long-term routes carrying substantial equipment |
Ask a supplier for the system's load rating, support spacing, surface specification, threshold details, and maintenance requirements. Match those details to the actual mobility device, not an assumed standard chair.
A portable configuration may solve a temporary access problem, while a modular system may suit a changing home layout. DME Superstore's information on a portable ramp for wheelchairs can help you compare portable access with a more permanent route.
Permits, Codes, and the Questions to Ask Before You Build
Call the local building department before construction. A private single-family home isn't automatically governed by the ADA in the same way as a public facility, but local building, zoning, setback, and structural rules can still control the project. The permit trigger may depend on whether the ramp is portable, modular, attached, or permanently supported.
The 1991 ADA Standards established a foundational U.S. benchmark for ramp geometry, and the 2010 ADA Standards continue to provide the familiar maximum running slope of 1:12 for new construction. Treat these standards as a safety framework, then verify which local rules apply to your property and project.
Get the approval path in writing
Ask the authority having jurisdiction:
- Permit requirement: Does the ramp need a building permit, zoning review, or both?
- Property limits: Will the route cross a setback, easement, sidewalk, or shared boundary?
- Structural details: What footing, attachment, or load documentation is required?
- Inspection timing: Which work must be inspected before it is covered or completed?
Keep the approved drawing, product specifications, load information, and inspection record. If the project includes door widening or threshold work, list that work in the same conversation instead of treating it as unrelated.

Know what inspectors and users will notice
An inspection may look beyond the headline slope. Check handrail continuity, graspable profiles, landings, surface traction, edge protection, uniform running slope, and the 1:48 cross-slope limit. Verify that landings drain water without directing it toward the doorway.
Common failures include a long run without the required intermediate landing, handrails that stop before the usable end of the run, and landings that drain the wrong way. A technically measured ramp can still be operationally unsafe if the door swing blocks the landing or the user can't turn to leave.
Local guidance varies. A Utah building codes guide from Superior Home Improvement illustrates why location-specific review matters, but homeowners should confirm requirements directly with their own city or county.
Maintenance, Seasonal Checks, and When to Re-Evaluate
A ramp is equipment. Inspect it with the same discipline you'd use for a wheelchair, lift, or vehicle transfer aid.
Start with a quick visual check each week. Look for standing water, leaves, ice, loose edge protection, shifted supports, damaged treads, and new gaps at the threshold. Run the user's chair over the route slowly and pay attention to vibration, side drift, and any transition that wasn't noticeable on foot.
Once a month, inspect fasteners, handrail attachments, surface wear, and landing stability. Wooden ramps need resealing and close inspection for rot or warping. Aluminum systems need checks for movement, loose connections, and surface damage. Concrete routes need attention to cracking, settlement, and drainage.
Use the seasons to test the design
Before wet weather, clear drainage paths and confirm that water doesn't collect at the door. Before freezing weather, remove leaves and debris, plan a de-icing approach that won't destroy traction, and use products appropriate for the household and pets. After storms or freeze and thaw cycles, check whether supports or transitions have shifted.
The person and the equipment can change faster than the structure. A user may move from a cane to a walker, receive a larger power chair, or begin relying on a caregiver. A ramp that worked last year may now have an approach that is too narrow or a landing that doesn't allow safe turning.
Call for help when the structure changes
Handle cleaning, visual checks, and minor approved hardware maintenance yourself if you're comfortable doing so. Call a qualified contractor or ramp specialist when the slope seems altered, a landing settles, a handrail moves, a support shifts, or the user can no longer control the route safely.
Keep a short record of inspections and repairs. Re-evaluate the ramp whenever the user's mobility device, strength, balance, assistance level, or entrance routine changes. The finish line isn't installation. It's a route that remains safe for the person using it in real weather, with real equipment, every day.
DME Superstore offers portable, threshold, and modular ramp options alongside mobility equipment, so you can compare the access route with the chair, scooter, or rollator using it. Visit DME Superstore to review product specifications and ramp solutions, then measure the finished rise and landing before placing an order.
