



Buy the concentrator, add a humidifier bottle, and you'll breathe more comfortably. That's the advice you'll hear most often, and it's wrong for many people. A portable oxygen concentrator with humidifier isn't a standard pairing you can assemble from any parts on a shelf.
A humidifier is a conditional accessory. Whether it belongs on your setup depends on your prescribed flow mode, the exact device labeling, and whether you have dryness that needs treating. Fit a bottle to the wrong mode and you can change how the machine triggers, add resistance to the oxygen path, or reduce the oxygen you receive. Skip the bottle when you do need moisture and you may endure preventable nose and throat irritation.
The order matters. Start with the prescription, check the labeling, then handle the bottle. Don't start by shopping for accessories.
Why a Humidifier Is Not an Automatic Add-On
Most buyers assume every concentrator needs a humidifier bottle, the way every car might benefit from a roof rack. A rack helps certain vehicles carry certain loads. Fit one to every car and you create drag, noise, and fit problems for no gain. A humidifier works the same way.
Your nose and upper throat already add moisture. With low-flow oxygen through a nasal cannula, the oxygen mixes with room air you pull in around it, so the gas reaching your airway isn't fully dry. Many people on low flow feel fine without any added water. If you're new to the equipment, our explanation of what a portable oxygen concentrator does covers how that mixing happens in plain terms.
When Dryness Becomes a Real Issue
Higher flow changes the balance. More of each breath comes from the machine and less from the room, so you inhale more comparatively dry gas and lose more water from the airway lining. That's why humidification enters the conversation at higher rates, during long daily sessions, or when you report significant dryness.
The American Lung Association guide to oxygen delivery devices notes humidification is generally not a default for low-flow nasal cannula use, and it's commonly considered when flow exceeds approximately 4 L/min, therapy is prolonged, or you develop clinically significant nasal or upper-airway dryness. The same guidance notes evidence for improved clinical outcomes is limited, although humidification may improve comfort at flows above 4 L/min.
So treat the bottle mainly as a comfort measure, not a treatment upgrade. It doesn't raise your oxygen level. It doesn't correct a wrong setting.
Your First Two Notes
Before you touch any accessory, write down two things and carry them into every other decision.
- Prescribed flow and mode: The exact number and whether it's continuous or pulse-dose.
- Dryness symptoms: Where you feel it, when it's worst, and whether it causes soreness, crusting, or nosebleeds.
Those notes decide whether there's even a question to ask. Without them, you're guessing.
The prescription and the device labeling decide whether a bottle belongs on the concentrator, not the fact that a port exists.
Which Setups Accept a Humidifier and Why Pulse-Dose Matters
Find the row that matches your prescription first, then read the last column before you attach anything.
Humidifier use by concentrator setup
| Setup | Humidifier generally considered? | Check first |
|---|---|---|
| Continuous flow at 4 L/min or below | Not a default; add only for reported dryness | Prescribed flow and symptoms |
| Continuous flow above 4 L/min | Often considered for comfort | Manufacturer labeling and clinician advice |
| Pulse-dose mode | Only if the maker lists the bottle for pulse-dose use | Triggering, added resistance and delivered oxygen |
| Oxygen bypassing the nose, such as a tracheal tube | Clinically indicated | Clinician-directed setup with an approved adapter |
| Device labeling silent on humidifiers | Do not attach | Written confirmation from the manufacturer |
The middle column tells you what is typical. The last column tells you what to verify, and that column outranks the others every time.
A Tap Versus a Cup
Continuous flow streams oxygen all the time, like a tap left running. You breathe in part of that stream, and the rest escapes while you exhale. Pulse-dose delivers a measured puff only when you inhale, like a cup filled only when someone drinks. The machine must sense the start of your breath, then release the puff quickly enough to be useful.
That sensing step is why a bottle can't be moved freely between modes. Humidifier thresholds are usually written for continuous-flow systems. Add a bottle to a pulse-dose path and the extra volume and resistance can affect triggering or reduce delivered oxygen if the manufacturer hasn't approved that setup. The different types of portable oxygen concentrators don't all offer both modes, so confirm which yours provides before you assume a bottle fits the mode you use.
Why Setting 2 Is Not 2 Litres
A gear labeled 3 on two different engines doesn't give the same speed. A pulse setting labeled 2 works the same way: a maker-specific dose, not a universal flow rate.
A peer-reviewed comparison indexed on PubMed tested four devices, the Invacare XPO2, Respironics EverGo, AirSep FreeStyle, and Inogen One. At setting 2 and 15 breaths per minute, measured pulse volumes ranged from 18.2 mL for the FreeStyle to 40.8 mL for the XPO2, with oxygen concentrations from 91.9% to 94.4%. Researchers tested 15 to 35 breaths per minute and concluded settings must be adjusted to each person at rest and during activity.
Read that range carefully. One machine delivered more than twice the pulse volume of another at the same displayed setting. If you add a bottle, lengthen tubing, or swap models without clinical review, you can't assume the dose stayed the same just because the number on the screen didn't change.
What the Labeling Can and Cannot Tell You
In the United States, these machines are Class II portable oxygen generators that separate nitrogen from room air, so specifications for concentration, flow, and mode sit in each device's own clearance and manual. A 2008 FDA clearance document specified oxygen output of at least 91% with a ±3% tolerance, while other filings describe wider ranges for different modes. Those differences are normal, and they mean you can't borrow compatibility from a similar looking model.
Some FDA clearance filings state that humidification bottles are not recommended for a given device, so only use a bottle that the manual explicitly approves for your model and mode. That single line in a manual matters more than any marketing phrase like home ready or travel friendly. If your manual is silent, or names a bottle only for continuous flow, you don't have permission for pulse-dose use.
Practical rule: If the labeling doesn't name humidifier use for your exact model and mode, treat the answer as no until the manufacturer confirms it in writing.
Get that answer in writing before you buy, borrow, or travel with a bottle attached.
How to Attach and Set Up the Humidifier
Only follow these steps after the labeling and your clinician agree the bottle belongs on your setup. Work on a clean, flat surface with clean hands, and keep the manufacturer's instructions beside you. If any step conflicts with your manual, the manual wins.
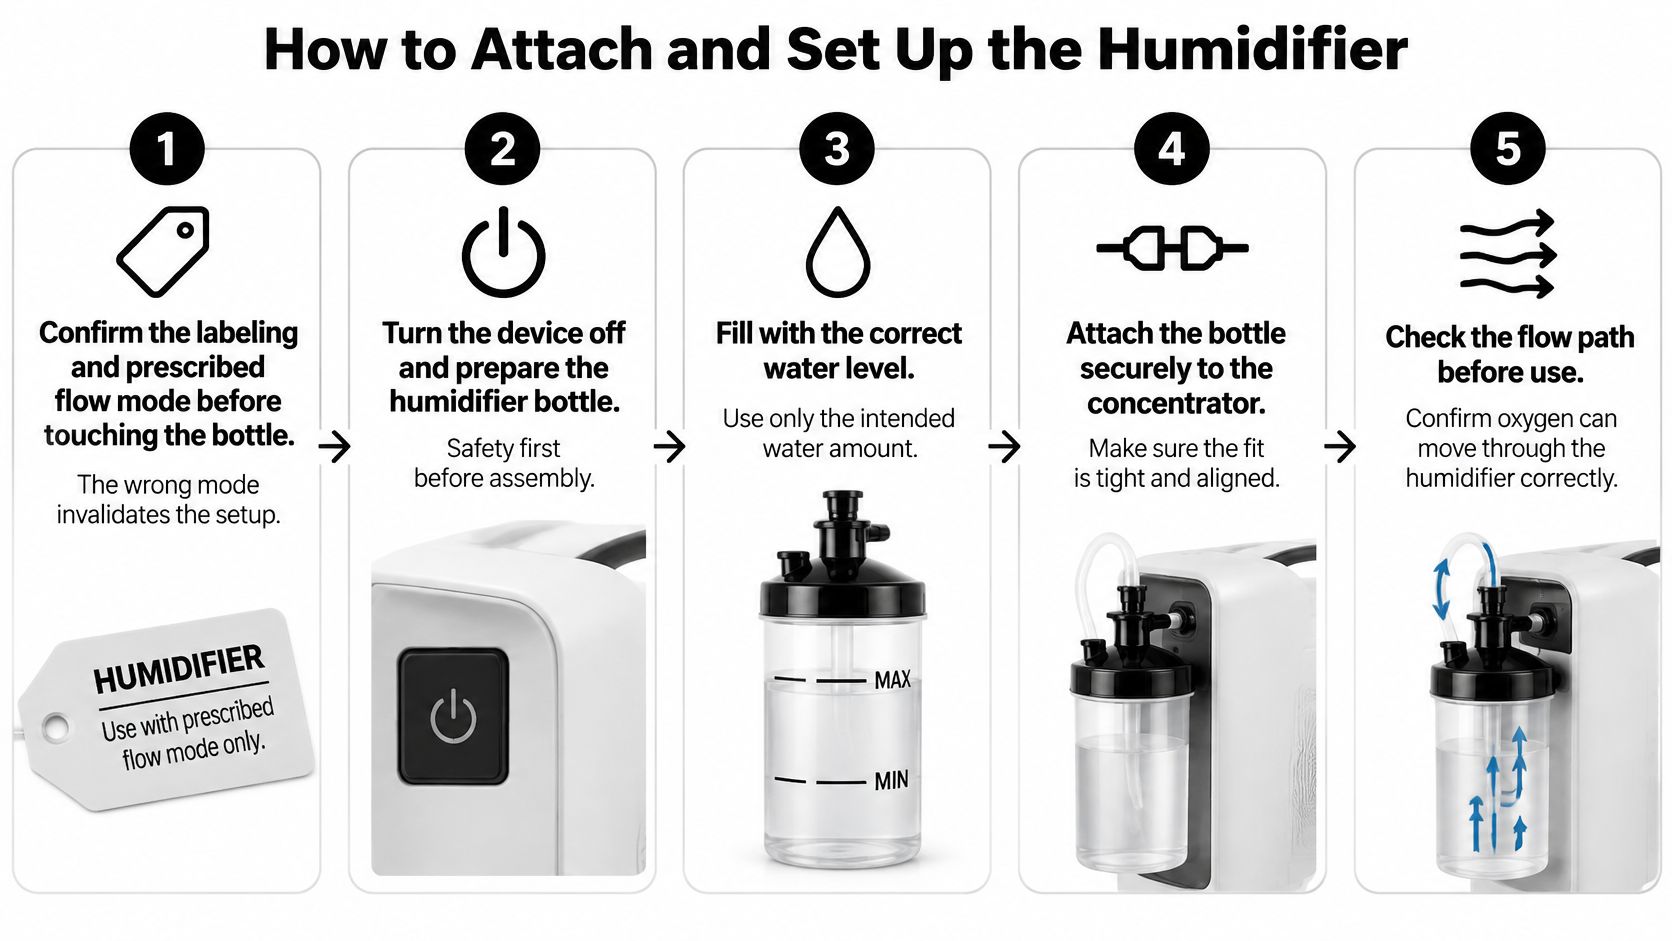
The Setup Sequence
- Confirm the labeling and prescribed mode. The wrong mode invalidates everything that follows. Don't proceed on a seller's verbal assurance alone.
- Turn the concentrator off and disconnect the patient tubing. Working with the machine running makes leaks harder to spot and can push water where it shouldn't go.
- Fill the bottle to the fill line with distilled or sterilized water only. Tap water adds minerals that coat the bottle and contaminants you don't want in the breathing path. Overfilling is a common slip, so stop at the line, not near the cap.
- Inspect the cap, seals, and bottle for cracks or worn threads. A connection that isn't airtight leaks oxygen before it reaches you. Replace damaged parts rather than tightening harder.
- Attach the bottle using the manufacturer's threaded connection or approved adapter. It sits between the concentrator outlet and your tubing. An improvised adapter is the second common slip, because a near fit can leak or add resistance.
- Set the bottle upright and level in its holder. Tilting can send water into the oxygen path and toward your cannula. If the holder lets it tip when you move, fix the placement before you switch on.
- Connect the patient tubing to the bottle outlet, not the concentrator. Oxygen must pass through the water first. Reversed connections are an easy mistake, so trace the path with your finger from machine to bottle to cannula.
- Turn the concentrator on and verify the prescribed setting. Listen for hissing leaks, check that alarms are active, and confirm you feel flow at the cannula. Don't raise the setting to compensate for a leak.
For the day to day handling that surrounds this process, see the guide on how to use an oxygen concentrator and keep it with your manual.
What Correct Looks Like
A correct setup gives steady flow at the prescribed setting, no leak sound, no water bubbling into the tubing, and comfortable breathing without gurgling. The bottle stays vertical while you sit, stand, and move around the room.
If you don't see bubbling in the bottle during continuous flow, switch off and recheck the cap seal and connections. If water reaches the tubing, switch off, empty the tubing away from the machine, and recheck fill level, bottle position, and inlet versus outlet placement. Don't keep using a setup that sends water toward your nose.
Cleaning, Water and Replacement Schedule
Treat the bottle as part of the breathing circuit, not as a comfort extra you rinse when you remember. Everything in that water sits upstream of your airway. Stagnant or contaminated water can introduce pathogens into the circuit, and a wrong adapter, extra tubing, or water entering the oxygen outlet can create resistance, leakage, or equipment damage.
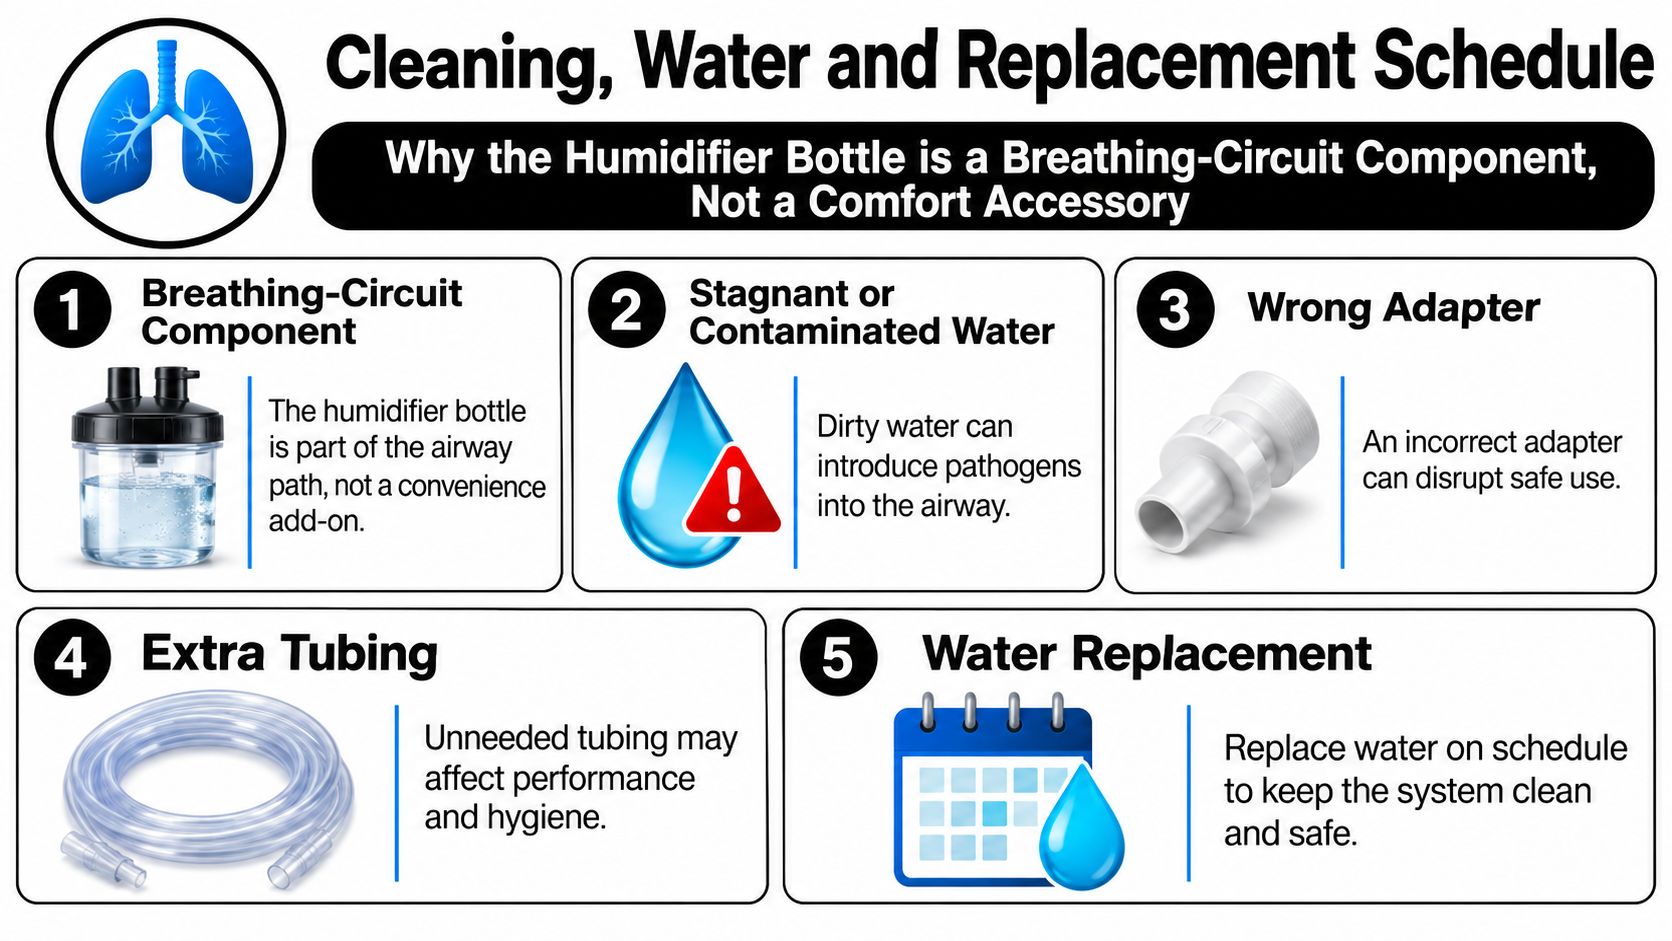
The WHO-aligned technical guidance on oxygen concentrators specifies the bottle be filled only with distilled or sterilized water, replaced at least daily and after each user, and checked for leaks or impaired flow whenever it's changed. It also notes portable concentrators commonly provide maximum flows around 5 or 10 L/min, but usable flow, concentration, triggering, and battery runtime vary by model, so your prescribed setting stays in control.
Your Daily Routine
- Empty, don't top up: Discard old water completely and refill with fresh distilled or sterilized water.
- Rinse and air-dry between sessions: Follow the manufacturer's cleaning instructions for washing, and let parts dry fully before reassembly.
- Check flow and seals at every change: Look for leaks, cloudiness, mineral film, and any drop in flow at the cannula.
- Keep water out of the oxygen outlet: Dry connections before fitting, and never carry or store the device with water sloshing in the bottle.
- Replace on schedule: Follow the maker's replacement interval, and sooner if cleaning no longer restores a clear, intact bottle.
Our notes on choosing and maintaining an oxygen concentrator water bottle expand on bottle fit and fill lines, which helps when you're comparing replacements.
Stop Signs
Stop using the bottle and contact your clinician or supplier if you notice cloudy water, visible growth or slime, a cracked bottle, reduced flow you can't explain, or an alarm for low oxygen concentration or flow interruption. Don't try to clear a problem by increasing flow.
When you're choosing a model, ask how its alarms and testing procedures flag low concentration and interrupted flow, and how easily you can remove the bottle for daily cleaning. A bottle you can't reach comfortably won't get cleaned daily, and that practical detail matters as much as any specification.
Travel Planning With a Humidifier-Equipped Concentrator
An FAA-accepted label doesn't guarantee acceptance under every carrier's process, and it says nothing about whether your battery lasts the whole journey. Older adults and caregivers often read allowed in the cabin as adequate for the entire trip. Those are two different claims, and only the first one is on the label.
Plan your trip with the setup pictured here in mind, upright, secured, and within reach for checks.
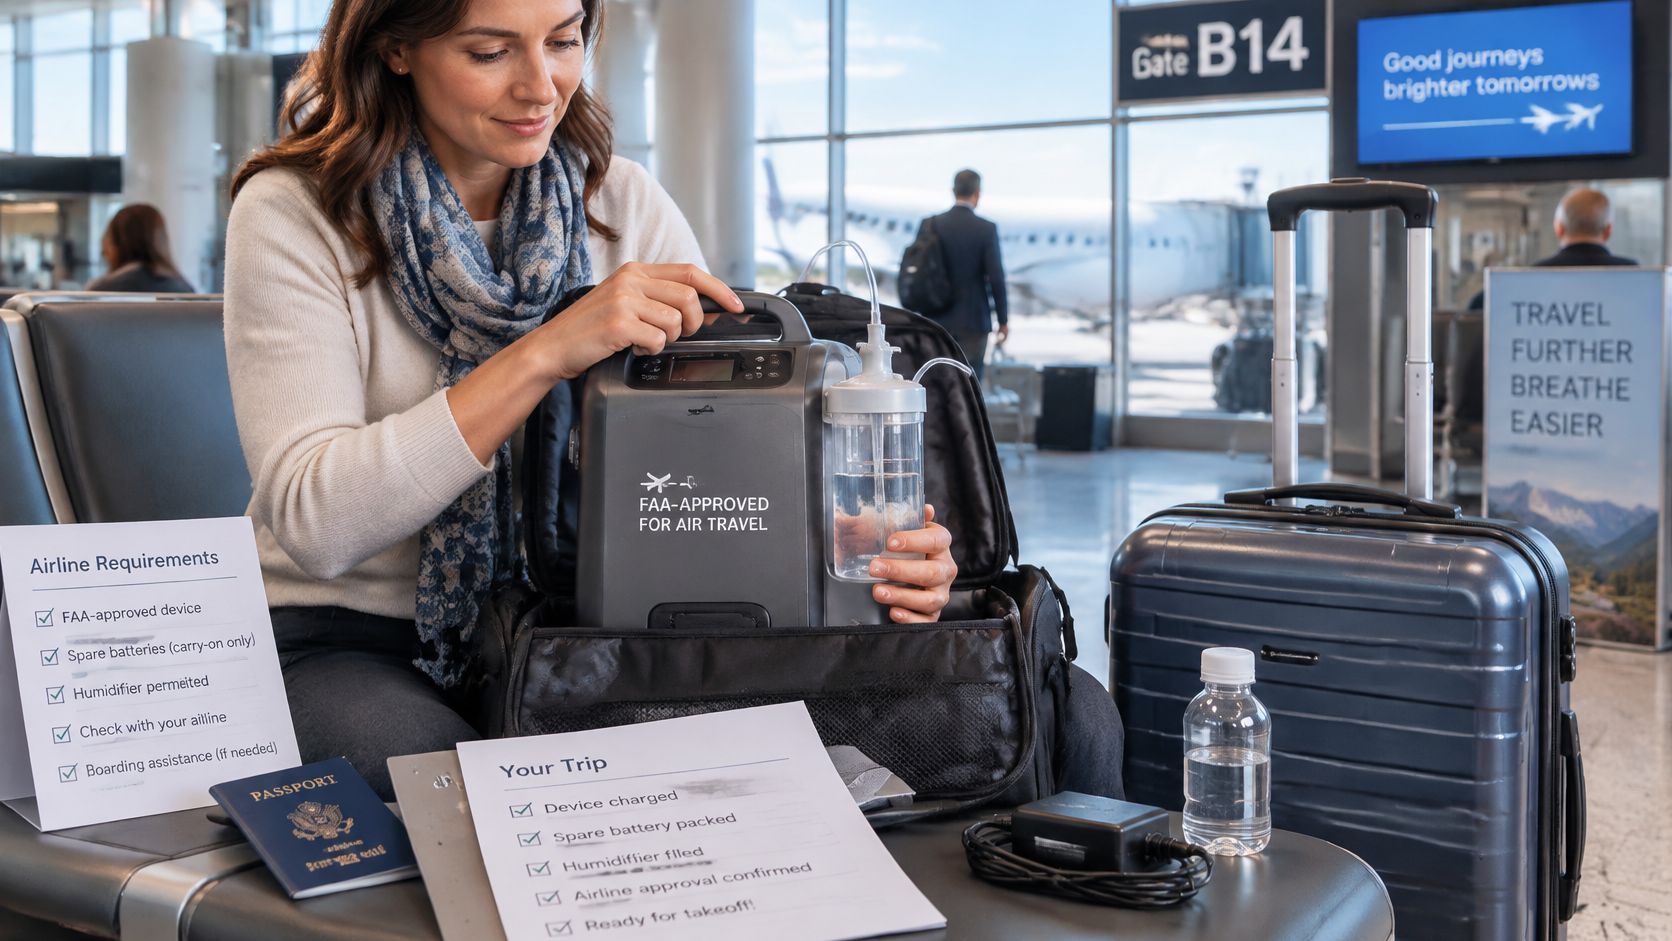
Trip planning worksheet for a POC with humidifier
| Planning item | Rule to apply | Example for a 6-hour flight |
|---|---|---|
| Battery runtime | At least 150% of flight duration | At least 9 hours at the prescribed setting |
| Total time away from power | Count check-in, security, delays and connections | Plan for the full day, not 6 hours |
| Battery watt-hours | Confirm rating covers the full plan | Check rating against total runtime at the prescribed setting |
| Spare batteries | Carry safely and protect from short circuits | Enough spare capacity to cover the full plan |
| Charging access | Confirm where you can recharge en route | Outlet or charger available at each connection |
| Backup power | Cover delayed connections and ground transport | Backup for a delay beyond the planned buffer |
| Carrier documentation | Physician note and device-specific forms where required | Request forms before booking |
| Humidifier test | Run the full setup at the prescribed setting before departure | One complete test run at home |
Count the Whole Day
The U.S. Department of Transportation guide to portable oxygen concentrators says airlines may require physician documentation, advance notification, and batteries sufficient for at least 150% of flight duration, with spare batteries carried safely and protected against short circuits. For a 6-hour flight, that's 9 hours at your prescribed setting as a floor, not a comfort margin.
Your real day is longer. Check-in, security, boarding delays, a diversion, and ground transport all draw on the same batteries. Add them, then ask where you'll recharge and what covers a missed connection. If you're coordinating a work trip alongside medical logistics, business flight planning support from MyAirlinesTrip can help you map connections and buffers while you handle the carrier's medical forms separately. Keep spare batteries and portable oxygen concentrator accessories such as chargers and protective battery covers in your cabin bag, not checked luggage.
Watch this walkthrough before your home test so you can compare your own connections and alarms against a complete setup.
Run the complete setup, humidifier included, at your prescribed setting for one full test at home. Advertised runtime often reflects a lower setting than yours. If pulse-dose triggering may become unreliable when you're tired, asleep, or breathing through your mouth, get clinician guidance before you book, not at the gate. Empty and secure the bottle for movement through the airport if tilting is likely, and refill only when you can keep it upright.
Before booking, request the carrier's device-specific forms, physician documentation requirements, battery calculation method, and advance notice deadline in writing. A form you discover at check-in is a trip you may not take.
Confirm Your Setup Before You Buy or Travel
Bring every decision back to one short verification sequence. Do it in order, write the answers down, and don't skip ahead to price or size.
The Five Checks
- Record the prescription. Write the flow, whether it's continuous or pulse-dose, and the hours per day you're told to use it.
- Read the labeling for humidifier approval. Note the exact bottle or adapter model named. Silence isn't approval.
- Ask your clinician two questions. Do you need humidification for your flow and symptoms, and does pulse-dose triggering stay reliable with a bottle fitted?
- Confirm continuous flow if it's prescribed. A pulse-only machine can't be argued into meeting a continuous-flow prescription, with or without a bottle.
- Test at home. Run the full setup at your setting, trigger the alarms as the manual describes, and time the battery before any trip depends on it.
Say your prescription is continuous flow overnight and pulse-dose while walking. That single detail changes the shopping list completely. You'd need a model that provides continuous flow, labeling that permits a bottle in that mode, and a clinician's view on whether your overnight dryness justifies it. A smaller pulse-only unit with a bottle strapped on wouldn't meet the prescription, however portable it looks.
Buying Criteria That Actually Protect You
- Explicit humidifier compatibility: Named in the labeling for your model and mode, not inferred from a photo.
- Approved bottle and adapter: The exact parts listed, available as replacements.
- Cleaning access: A bottle you can remove, empty, and dry daily without tools or strain.
- Alarms and testing: Clear alerts and procedures for low oxygen concentration and flow interruption.
- Written confirmation: Ask the seller in writing whether your specific model and humidifier combination is listed as compatible, and keep the reply.
Use product pages to compare specifications, compatible accessories, and warranty terms side by side, then verify those claims against the manufacturer's manual. If the page and the manual disagree, believe the manual and ask why.
The prescription, not the product page, sets your final flow.
A portable oxygen concentrator with humidifier can be the right setup when your flow, symptoms, labeling, and clinician all point the same way. When they don't, the safest accessory is the one you leave off.
Browse portable oxygen concentrators, compatible humidifier bottles, batteries, and carrying accessories at DME Superstore, where product pages list specifications, compatible accessories, and warranty terms so you can check them against your prescription and manufacturer labeling. Bring your prescribed flow mode and model name when you shop, and ask for written confirmation that a specific bottle and adapter are listed for your device before you order.
