


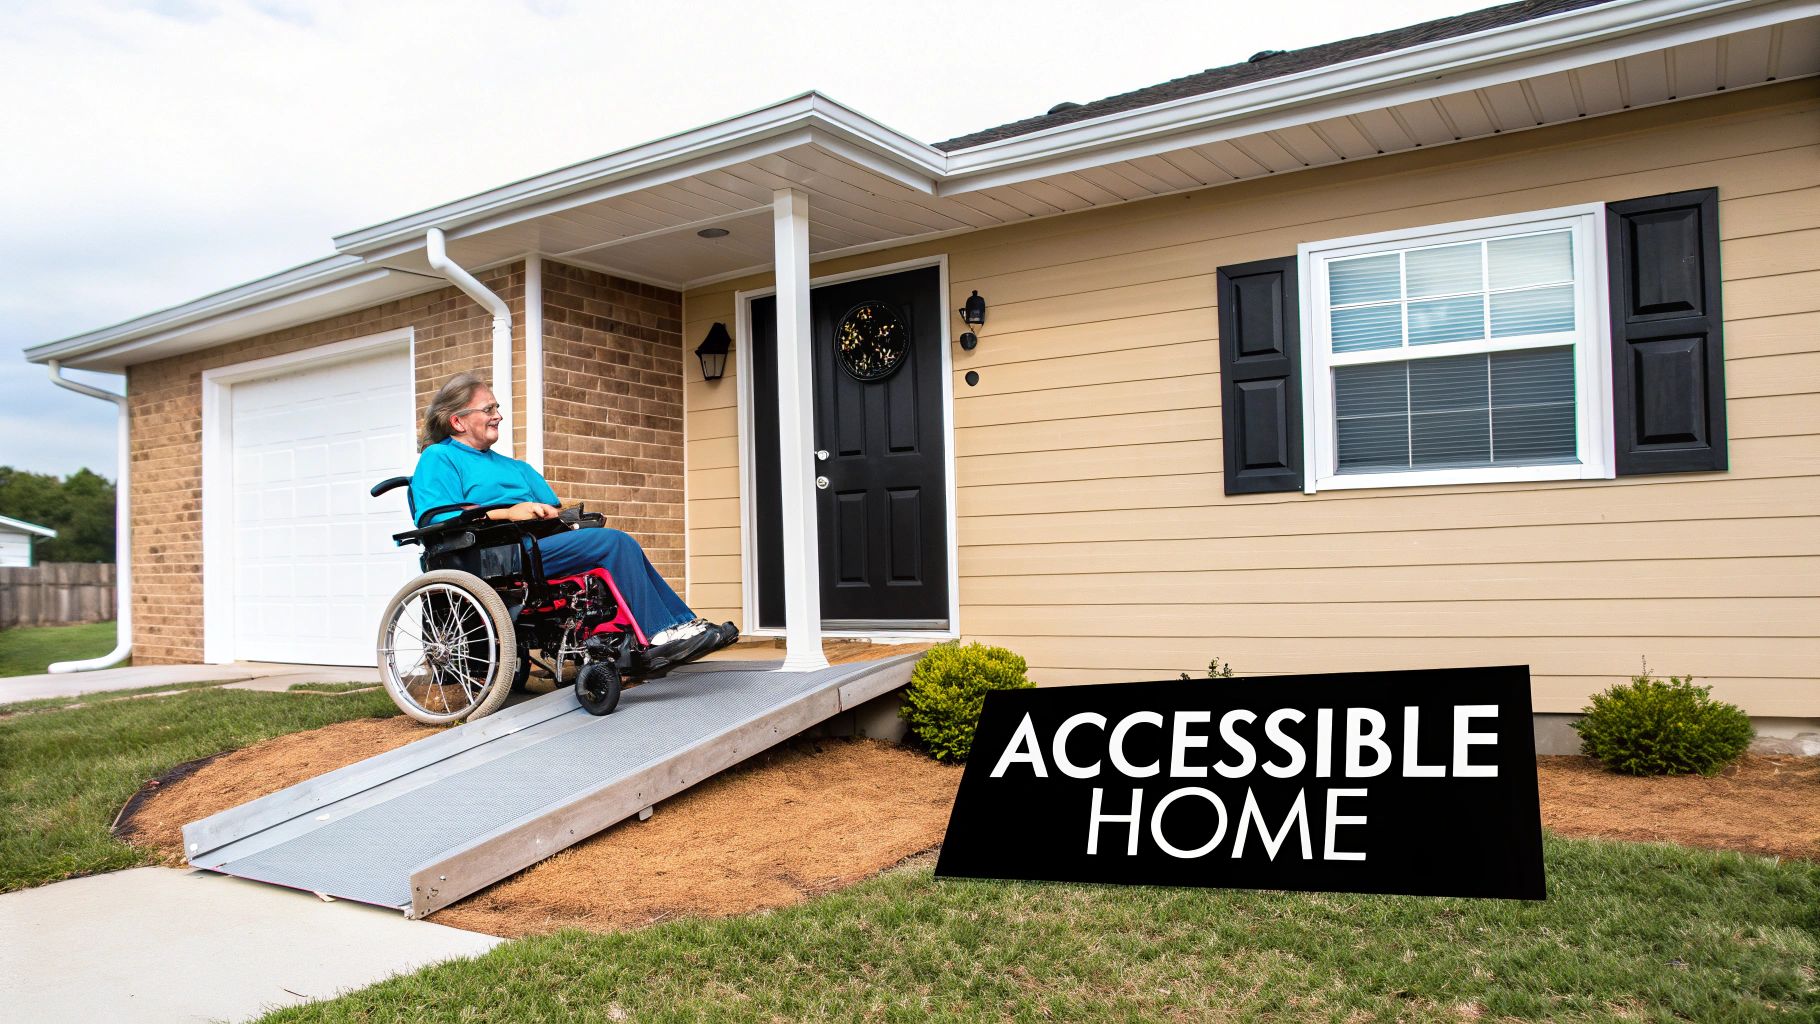
Choosing the right wheelchair ramp is a critical step in ensuring safety, freedom, and accessibility in your own home. The ideal wheelchair ramps for home transform daily obstacles into simple, navigable paths, empowering individuals with greater independence. This guide is designed to provide you with the essential knowledge to make an informed decision, ensuring your home is a place of comfort and confidence.
Your First Step Toward a More Accessible Home
Making your home easier to navigate is a practical journey, and this guide serves as your comprehensive roadmap. We have structured it to provide clarity and confidence, helping you select the best accessibility solution for your specific circumstances.
Consider this process as building a bridge—not just over a physical barrier, but toward a more independent and self-sufficient lifestyle. We will walk you through every necessary consideration, from understanding the various types of ramps available to ensuring precise measurements for a perfect and safe fit.
What This Guide Will Cover
Our objective is to equip you with the knowledge needed to choose the most suitable solution for yourself or a loved one. We will explore the key topics essential for finding the ideal wheelchair ramp.
- Understanding Ramp Types: We will compare different ramp styles, from portable "suitcase" ramps designed for travel to robust modular systems that can be configured for complex entryways.
- Accurate Measurements: You will learn the correct methodology for calculating ramp length and slope, which is crucial for ensuring every use of the ramp is smooth and secure.
- Materials and Safety: We will delve into why specific materials like aluminum are widely used and identify the safety features that are non-negotiable for daily operation.
- Installation and Costs: Gain a clear understanding of the installation process and learn how financing options or FSA/HSA funds can be utilized for your purchase.
A well-chosen ramp is a powerful tool for independence. It's an investment in safety, confidence, and the ability to navigate your own home with ease and dignity. This is a core part of successful aging in place.
Ultimately, this guide is your partner in creating a home environment that supports and enhances mobility. If you're looking for more ways to maintain independence, you can learn more about aging in place in our detailed article.
Let’s begin the process of building that bridge to greater freedom, right at your own front door.
Choosing the Right Type of Wheelchair Ramp
Selecting the right type of wheelchair ramp is the most critical decision in creating a safe and accessible home. This is not a one-size-fits-all scenario; the optimal ramp depends on your home's layout, your specific mobility requirements, and your daily lifestyle. Let's examine the different types to help you identify the perfect fit.
The field of home accessibility is expanding rapidly. The wheelchair accessibility market was valued at approximately USD 5.10 billion and is projected to reach USD 10.76 billion by 2032. For families, this growth translates to more innovative products, enhanced designs, and a wider range of options than ever before.
Comparing Home Wheelchair Ramp Types at a Glance
For a quick overview, the following table breaks down the main differences between the most common ramp types. It serves as an excellent starting point to help you narrow down which options are most relevant to your situation.
| Ramp Type | Primary Use Case | Portability | Installation Type |
|---|---|---|---|
| Threshold Ramp | Small rises like doorways & sliding door tracks | Very High | Simple (often just set in place) |
| Portable/Folding Ramp | On-the-go access for travel & visiting others | High | Temporary (set up and take down as needed) |
| Modular Ramp | Taller staircases; customizable entryways | Low (Semi-Permanent) | Professional or DIY assembly |
| Permanent Ramp | Long-term, integrated home access | None | Professional construction (wood/concrete) |
Now that you have a high-level understanding, let's explore the specifics of each type to see how they function in real-world applications.
Threshold Ramps for Doorways
A threshold ramp can be thought of as a small, sturdy bridge designed for a single purpose: to help you smoothly navigate a small, single obstacle. This could be the raised threshold of a doorway, a sliding glass door track, or a slightly elevated entryway.
These specialized problem-solvers are typically made of rubber or aluminum, making them lightweight and compact. They are ideal for eliminating the jarring stops that can impede a wheelchair or walker. Because they address such a specific issue, they are among the most affordable and easiest solutions to implement. If you are facing challenges moving between rooms, our guide on threshold ramps and mats is an excellent resource.
Portable and Folding Ramps for On-the-Go Access
A portable or folding ramp is designed for convenience and mobility, much like a suitcase you can carry. These ramps are built for temporary use, giving you the ability to create accessibility wherever you go.
Portable ramps are particularly useful for:
- Visiting friends and family: A few steps at a loved one's home are no longer a barrier.
- Traveling: Use one to access a vehicle or navigate challenging hotel entrances.
- Temporary needs: They provide a perfect solution for short-term mobility challenges, such as recovery after surgery.
Their lightweight aluminum construction makes them easy to carry, set up, and store. While not intended for permanent, heavy daily use at a primary entrance, their flexibility is a significant advantage.
Modular Ramps for Custom Solutions
A modular ramp is like a customizable construction set for your home's entrance. It consists of a system of pre-made sections—including ramps, platforms, and handrails—that connect to create a tailored solution for your specific entryway.
This "building block" design makes modular ramps incredibly versatile. They are the preferred choice for addressing taller sets of stairs, as they can be configured with turns and resting platforms. While the installation is more involved than that of a portable ramp, it is still considered semi-permanent. This means it can often be disassembled or even reconfigured if you move.
The key benefit of a modular ramp is its adaptability. It can be tailored to almost any entryway, providing a safe, long-term solution without the high cost and permanence of a concrete construction project.
Permanent Ramps for Long-Term Integration
Finally, a permanent ramp is a structural addition to your home. These are custom-built structures, typically made of concrete or wood, designed to integrate seamlessly with your home’s architecture.
Because they are constructed on-site, they offer the highest level of stability and durability available. A permanent ramp is a significant investment in your home's infrastructure, designed for decades of reliable, daily use. This is the optimal choice for individuals who require a ramp for the long term and desire a solution that appears as a natural part of their property.
How to Measure and Calculate Your Ramp Needs
Determining the correct ramp specifications for your home is not about complex geometry; it is about understanding two fundamental concepts: rise and slope. Accurate measurements of these two factors are the most critical steps in creating a safe and user-friendly path for a wheelchair, scooter, or walker.
The goal is to create a gentle incline, not a steep, challenging climb. A small miscalculation can turn an accessible ramp into a frustrating or unsafe barrier. The entire purpose is to ensure every trip up or down the ramp feels secure, which is achieved by calculating the correct length.
This process ensures that whether you need a small threshold ramp or a full modular system, you will end up with a solution that genuinely improves access. The flowchart below illustrates how to approach your needs, from the simplest barriers to more complex ones.

As you can see, the decision-making process flows from the most basic obstacle (a single doorway threshold) to situations requiring a more involved portable or modular ramp. This visualization helps clarify how different ramp types solve specific access challenges around your home.
Step 1: Understanding and Measuring the Rise
The first step is to measure the rise. This is the total vertical height from the ground to the surface where the ramp will end, such as your porch floor or the top of the highest step. It represents the "height" of the incline you need to overcome.
Obtaining an accurate measurement is crucial. Here is a simple method:
- Place a long, straight board or a level on the top landing, extending it horizontally over the ground.
- Ensure the board is perfectly level.
- Using a tape measure, measure the vertical distance from the underside of the board straight down to the ground.
- That measurement, in inches, is your total rise.
This number is the foundation for all subsequent calculations. Record it and double-check it, as an error here could result in purchasing a ramp that is dangerously steep.
Step 2: Calculating the Right Slope for Safety
Once you have the rise, the next component is slope, which refers to the steepness of your ramp. For wheelchair ramps for home, the industry standard for safety and comfort is a 1:12 slope ratio.
This means that for every 1 inch of vertical rise, you need 12 inches (or 1 foot) of ramp length. This gentle incline is consistent with the Americans with Disabilities Act (ADA) recommendations and ensures the ramp is safe for manual wheelchair users, power chairs, and individuals using scooters or walkers.
This ratio simplifies the process of finding your ideal ramp length. Just remember this straightforward formula:
Total Rise in Inches = Required Ramp Length in Feet
For example, if your rise is 24 inches, you need a ramp that is 24 feet long. This direct conversion is your key to achieving a safe and comfortable incline every time.
When to Adjust the Slope
While the 1:12 ratio is the universal recommendation for any occupied ramp, there are a few exceptions. These should be considered with extreme caution, as they result in a steeper path.
- 1:10 Slope (Slightly Steeper): This means for every 1 inch of rise, you need 10 inches of ramp length. A 24-inch rise would require a 20-foot ramp. This slope may be suitable for a powerful electric wheelchair or scooter, particularly with caregiver assistance, but it can be challenging for someone in a manual wheelchair.
- 1:8 Slope (Steep): This ratio should only be used for loading an unoccupied wheelchair or scooter into a vehicle. It is far too steep for a person to use safely and must be avoided for home access ramps.
A Practical Example of Ramp Calculation
Let's walk through a real-world scenario. Imagine your front entrance has three steps leading up to the porch.
- Measure the Rise: You use a level and a tape measure and determine the total vertical height from the ground to your porch is 18 inches.
- Calculate the Length: Applying the recommended 1:12 slope, you convert the inches to feet. 18 inches of rise = 18 feet of ramp length.
- Find the Right Product: You now know you need a ramp system that is at least 18 feet long. This would lead you to consider modular systems or longer portable options, such as the versatile DMI Retractable Lightweight Portable Wheelchair Ramps, which are available in various lengths to suit your needs.
By following this simple, two-step process, you can confidently determine the correct ramp length for your home, ensuring a safe, reliable, and comfortable path to greater independence.
Comparing Materials and Essential Safety Features
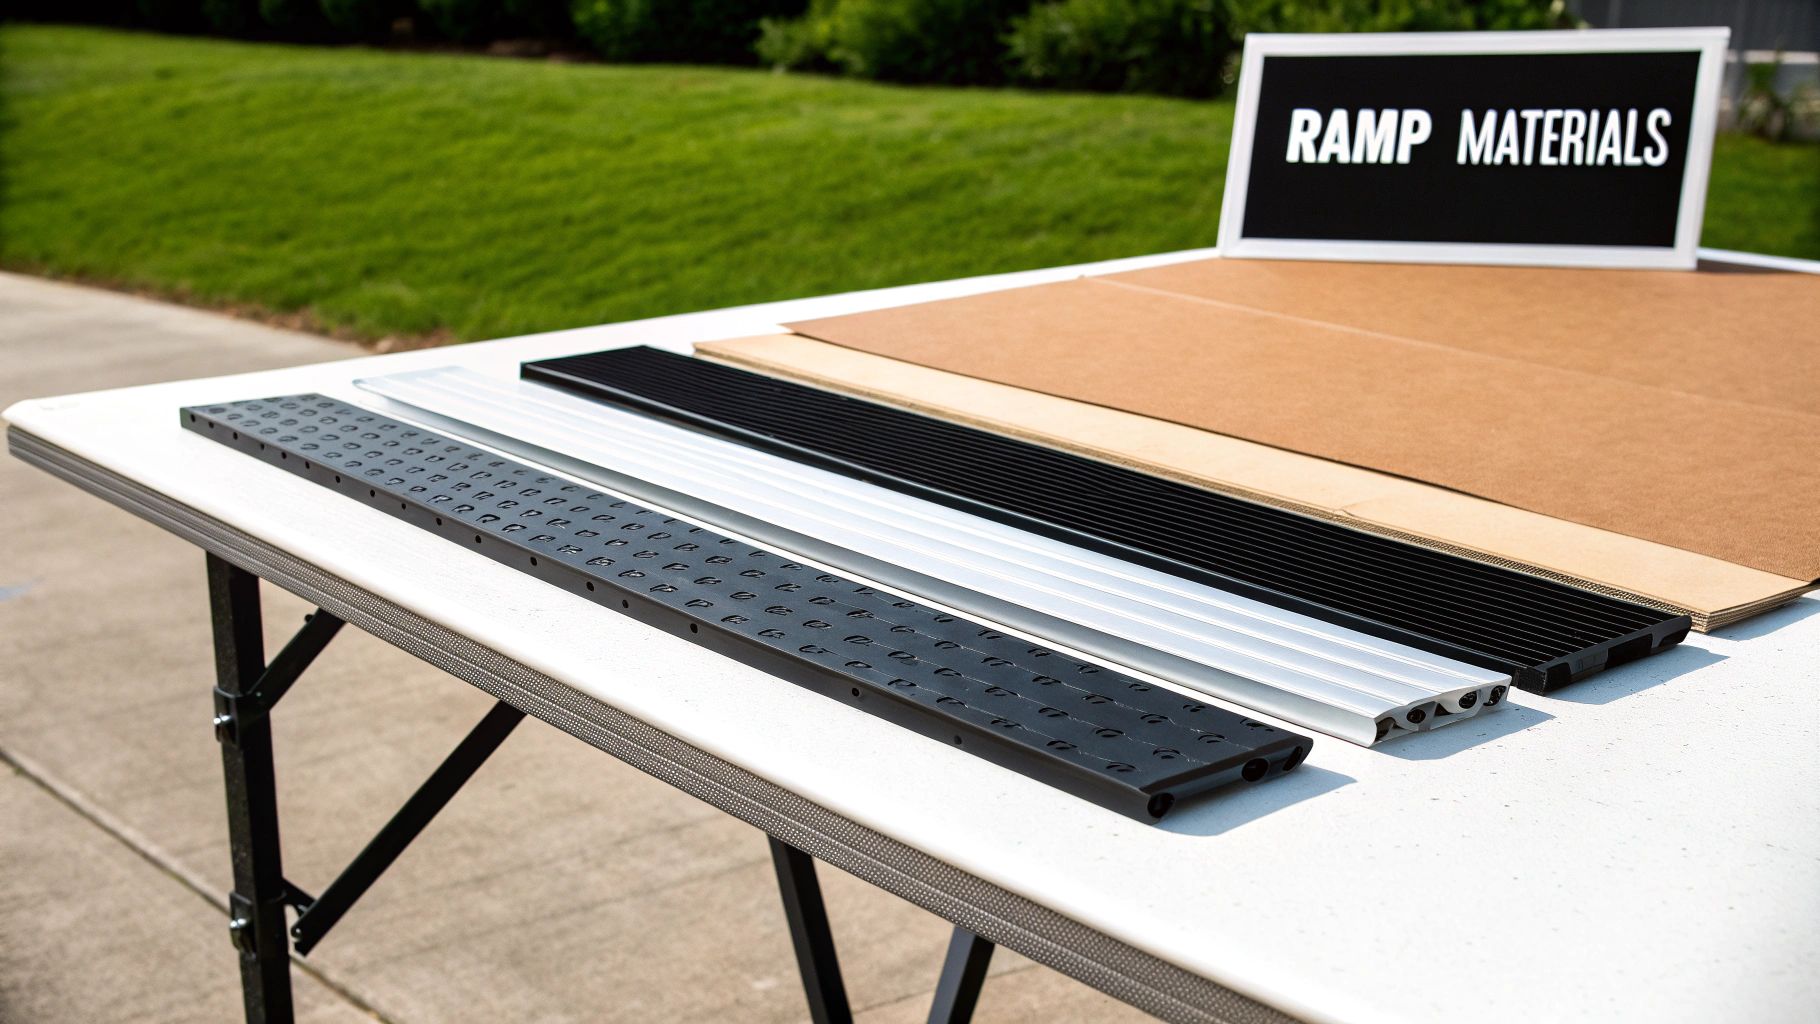
Once you have determined the correct type and length for your ramp, the next significant decision involves the material. A ramp's material defines its primary characteristics—it dictates durability, weight, and the level of maintenance required over time.
Equally important are the built-in safety features. These details transform a simple incline into a dependable pathway that you can trust in any condition.
Choosing the right material involves balancing strength, portability, and longevity. The three most common materials for wheelchair ramps for home each offer distinct advantages, and selecting the right one ensures your investment is both safe and durable.
Aluminum: The Lightweight Champion
Aluminum is the preferred material for most portable and modular ramps for good reason. It is exceptionally strong yet surprisingly lightweight, which simplifies setup, transportation, and storage. This makes it the ideal material for folding "suitcase" ramps or multi-part modular systems.
Another significant advantage of aluminum is its natural resistance to rust and corrosion. An aluminum ramp can be exposed to rain, snow, and humidity and will maintain its integrity with minimal maintenance. It is a practical, low-maintenance choice for long-term outdoor use.
Steel: The Heavy-Duty Workhorse
When maximum strength is the priority, steel is the answer. Steel ramps are robustly constructed to handle substantial weight, making them the only viable choice for bariatric users or for supporting the heaviest power wheelchairs and scooters. Their solid construction provides an unparalleled sense of stability and security.
However, this strength comes with a trade-off: weight. Steel is significantly heavier than aluminum, making it impractical for portable ramps. It excels in semi-permanent or permanent installations where it will not be moved. High-quality steel ramps are always treated with a protective coating to resist rust, but they may require more maintenance over the years to remain in optimal condition.
Rubber: The Non-Slip Specialist
For small but challenging single steps or doorway thresholds, rubber is the superior material. It is the standard for threshold ramps because its high-traction surface provides exceptional grip, significantly reducing the risk of slips, even when wet. Rubber ramps can also be easily trimmed to achieve a perfect, snug fit against uneven thresholds.
They are solid and heavy enough to stay in place without being bolted down, making them a simple and effective solution for improving accessibility inside your home without permanent modifications.
The growing demand for reliable home access solutions is clear. The handicap ramps market, a sector where residential solutions are a key component, reached a valuation of USD 3.495 billion. This shows a strong commitment from families and providers to invest in safety and independence at home. Discover more insights about the growth of the residential ramp market on DataInsightsMarket.com.
Non-Negotiable Safety Features to Look For
Beyond the material itself, several key safety features are essential. These details distinguish a good ramp from a great one, preventing accidents and providing complete peace of mind with every use.
- Textured, Non-Slip Surfaces: A secure grip is paramount. Look for ramps with a grooved or textured surface that provides excellent traction for wheels in all weather conditions. This is arguably the most important feature for preventing dangerous slips.
- Raised Side Edges or Curbs: These act as guardrails for wheels. Raised edges, typically one to two inches high, prevent a wheelchair or scooter from accidentally veering off the side. They are a simple feature that guides you safely along the ramp.
- Secure Locking Mechanisms: For any portable or folding ramp, strong and easy-to-use locking pins or clamps are essential. They ensure the ramp sections remain firmly connected during use and securely folded during transport or storage.
Finally, always verify the ramp's weight capacity. It is crucial to calculate the combined weight of the user and their mobility device. A power wheelchair can easily add 200-300 pounds. Always choose a ramp with a capacity well above your total weight to ensure safe performance for years to come.
Planning Your Installation and Navigating Regulations
With your measurements taken and material chosen, it is time to consider the final step: installation. The installation process for wheelchair ramps for home can range from a simple placement to a more involved assembly. Understanding what to expect will ensure a smooth and safe setup.
Many smaller ramps are designed for straightforward self-installation. Threshold ramps, for example, typically require no tools. You simply place them over the doorway, and their weight and non-slip backing hold them securely in place. Portable and folding ramps are designed with the same user-friendliness—they are intended to be set up and taken down in minutes.
Conversely, larger modular systems often benefit from professional installation. Although they are designed with simple interlocking connections, ensuring that every section is perfectly level, stable, and securely fastened is critical for safety. Professional installers have the expertise to complete the job correctly and efficiently, providing you with complete confidence in the final structure.
The Importance of Landings
A crucial and often overlooked element in any ramp system is the landing. A landing is a flat, level platform that serves two essential safety functions, particularly for longer ramps.
- At the Top: A top landing provides a safe, stable area to open the door without the risk of rolling backward down the ramp. A platform of at least 5 feet by 5 feet is the recommended standard, as it allows a wheelchair to turn and maneuver comfortably.
- For Turns and Rest: If your ramp is long and requires a turn (a switchback), you will need intermediate landings. These provide a safe area to navigate the corner and also serve as a convenient spot to rest if needed.
Consider a landing a safe harbor. It breaks up the incline, making the transition from the ramp to the doorway seamless and secure.
Understanding ADA Guidelines for Home Ramps
You are likely familiar with the Americans with Disabilities Act (ADA), which sets strict standards for ramps in public spaces. It is important to know that these guidelines are not legally mandatory for ramps installed at a private residence.
However, it is highly advisable to view the ADA guidelines as the "gold standard" for safety. Adhering to these recommendations—such as the 1:12 slope ratio and appropriate landing sizes—ensures your ramp is as safe and user-friendly as possible for everyone. Following these standards maximizes usability and provides total confidence in your setup.
Even though it’s not required by law for private homes, designing your ramp to ADA specifications is the best way to guarantee it will be safe, comfortable, and easy for manual wheelchair users, power chairs, and scooters alike.
Checking Local Rules and HOA Regulations
Before installing a larger, semi-permanent modular or permanent ramp, it is always a good practice to research local regulations. While a small, portable ramp is unlikely to be an issue, a more substantial structure may be subject to local rules.
It is wise to make two key contacts:
- Your Local Building Authority: Call them to determine if a building permit is required for the ramp you plan to install. This is more common for permanent structures made of wood or concrete.
- Your Homeowner's Association (HOA): If you reside in a community governed by an HOA, review your covenants for any rules regarding exterior modifications or additions.
Taking these steps beforehand can prevent unwelcome surprises and ensure your installation is both secure and compliant. To ensure full compliance and safety for your home, it's also crucial to consult resources such as a guide on handrail height regulations, which provides essential information on legal requirements.
Understanding Costs and Payment Options
Making your home accessible is a vital investment in your safety and independence. When considering wheelchair ramps for home, understanding the financial aspects is a key part of the process. The cost can vary significantly, from a few hundred dollars for a simple threshold ramp to several thousand for a custom-built modular system.
Our goal is to provide transparency on these costs and outline the various pathways available to afford the ideal ramp for your needs.
The demand for home accessibility solutions is growing, which benefits consumers. As of 2023, the global wheelchair ramp market was valued at USD 2.5 billion, reflecting a significant and sustained need for high-quality, reliable ramps. This growth leads to greater product variety, improved designs, and more competitive pricing. You can read more about the wheelchair ramp market's expansion to see how these trends are making accessibility more achievable.
Using FSA and HSA for Your Purchase
One of the most effective ways to manage the cost of a ramp is by using a tax-advantaged health account. Since wheelchair ramps are considered eligible medical expenses, you can use funds from your Flexible Spending Account (FSA) or Health Savings Account (HSA) to purchase them.
This is a significant benefit, as it allows you to use pre-tax dollars for the purchase, effectively providing a substantial discount. Utilizing these accounts can make even a larger, more complex ramp system much more affordable.
Using your FSA or HSA funds for a wheelchair ramp is not just a payment method—it’s a smart financial strategy. It leverages your healthcare savings to directly improve your daily safety and independence at home.
Financing and Other Payment Solutions
In addition to health savings accounts, other options are available to make your purchase manageable. At DME Superstore, we offer financing that allows you to break down the total cost into smaller, predictable monthly payments. This is a practical solution for acquiring the ramp you need immediately without paying the full amount upfront.
Furthermore, various organizations and programs may offer financial assistance for home modifications. It is always worthwhile to explore resources like NDIS funded support for daily life, which can provide valuable support for making your home safe and accessible.
Got Questions? Here Are Your Answers
You have completed your research and are close to making a decision, but some practical questions may remain. This is a normal part of the process. Clarifying these final details will help you move forward with complete confidence in your new accessibility solution.
We have compiled the most common questions we receive from homeowners to serve as a final checklist for preparing your home.
Can I Use a Wheelchair Ramp for a Power Scooter?
Yes, absolutely. Most modern ramps are designed to accommodate both. The single most important factor to verify is the ramp's weight capacity.
Power scooters are considerably heavier than manual wheelchairs, so you must account for the combined weight of the user and the scooter. It is also important to note that scooters often have lower ground clearance. A ramp with a smooth, gradual transition at the top and bottom is essential to ensure the scooter does not get caught. Finally, always double-check that the usable width of the ramp is sufficient for your scooter's wheelbase.
A common mistake is only considering the user's weight. Always add the weight of the mobility device—scooters can add 200-400 pounds—to determine the total capacity needed for safe operation.
How Do I Maintain an Aluminum Wheelchair Ramp?
One of the primary advantages of aluminum ramps is their incredibly low maintenance requirements. A small amount of simple, regular care is all that is needed to keep them in excellent condition for years.
- Routine Cleaning: Periodically, sweep away leaves, dirt, and other debris. This is especially important as accumulated material can become slippery when wet.
- Winter Care: If you live in a snowy climate, clear the ramp promptly. When de-icing is necessary, try to use a salt-free ice melt. This will help prevent potential long-term corrosion and keep the ramp looking its best.
- Safety Checks: Occasionally, perform a quick inspection. Check that all bolts, pins, and connecting components are tight and secure. Examine the non-slip surface to ensure it is not showing excessive wear.
Do I Need a Permit to Install a Ramp at My House?
The answer to this question depends on the type of ramp and your local regulations.
For smaller, temporary solutions like portable or threshold ramps, a permit is almost never required, as they are not considered permanent structural modifications to your home.
However, if you are planning to install a large modular system or a custom-built permanent ramp, a permit is likely necessary. Your local building authority will probably want to approve the plans. The most prudent course of action is to contact your city's planning department and your Homeowner's Association (HOA) before beginning any work on a larger ramp system. A quick phone call upfront can prevent significant complications later.
At DME Superstore, we are committed to helping you find the perfect accessibility solution for your home. Explore our wide selection of high-quality wheelchair ramps designed for safety, durability, and ease of use. Visit us today to find the right ramp for your needs.

